


9
IRB-10c Transmitter
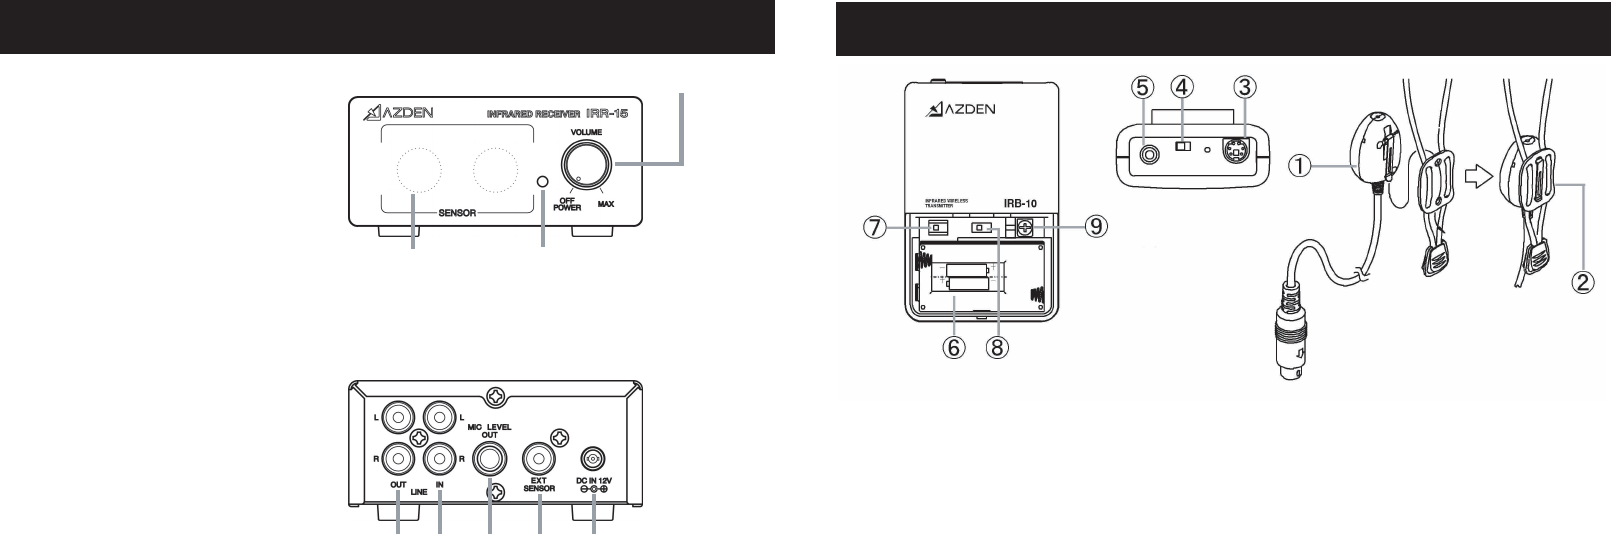
1. Batteries for the IRB-10c:
The IRB-10c uses two "AA" batteries for power. They are placed in the battery compartment.
After sliding the battery case door off, carefully place FRESH batteries in the compartment in the
directions shown on the sticker. OBSERVE PROPER POLARITY!
The IRB-10c can use either Alkaline or Ni-MH batteries. In the case of rechargeable batteries, be
sure that they are FULLY CHARGED before use. Battery life depends on the type of battery used.
2. Frequency Selection:
The IRB-10c can be set to transmit on either one of two preset frequencies. This is so that two
different speakers can talk at the same time in the same room. While it does not matter which
frequency is chosen for the body-pack, two transmitters cannot share the same frequency at the
same time. To select the desired frequency (channel) slide the switch (8) as shown on the sticker
on the back of the battery door.
3. Power Mode Selection:
The IRB-10c has two Power Modes - Lo and Hi. These modes can be selected via a switch (7)
inside the battery compartment, and affect two areas related to performance- battery life and area
coverage. If the body-pack is switched to the Hi position (7 - to the right) the range is set to
maximum (approximately 144 square meter(1600 square feet)) while the battery life is reduced to
approximately 10 hours with Alkaline batteries. If, on the other hand, the body-pack is switched to
Lo the operating range is reduced to approximately 108 square meter (1200 square feet) and the
battery life increases to approximately 15 hours with Alkaline batteries. Experimentation is the only
way to know which position is best for your room. We suggest, however, that it always best to use
the Lo position if possible as that provides the most economical use.
4. Adjusting MIC Gain:
The MIC gain (volume) is adjustable to compensate for various microphone element characteristics.
The adjustment (9) is located in the battery compartment and can be adjusted using the provided
tool. While speaking into your microphone, adjust the gain(more gain-clockwise rotation, less gain-
counterclockwise rotation) until the desired volume level is achieved. Best results are normally
achieved when the gain control on the IRB-10c body-pack and the volume control on the IRR-30
receiver (4 or 6) are both at their mid-points.
8
IRR-15 Receiver Set up
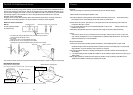
1. Power/Volume control - turn the receiver On and Off,adjust the mic output gain.
2. Power LED - Indicate the power state of the receiver.(RED:Power on,Green:Receiving signal)
3. Receiving Seonsor - internal receiving infrared sensors.
4.
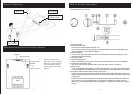
Mic/Line output - output both mic and line input signal.connects to audio amplifier/mixer aux input.
5. Line input - input line level signal in here
6. Mic output - connects the receiver to audio amplifier/mixer mic input.
7. External sensor input - Plugging an external sensor in here.
8. Plug in AC adapter(BC-27) to power receiver. Don't use other one beside of our recommending.
I. Receiver Front Panel:
II. Receiver Rear Panel: