


5
Receiver
New circuit design for minimizing the interference with the Plasma display .
New method for eliminating the strident noise.
Don't get interference by other generally used wireless method like UHF and VHF . At the same location,
even adjacent rooms, same package can be used without any interference.
Internal sensor can cover an open area up to 144 square meter under transmitter high power mode and
108 square meter with Lo mode.
Up to max. three external sensors can be extended depends on size of room. Three type sensors are
available as option item.
Azden Newly designed state-of-the-art Crystal Servo technology for frequency-stable transmitting
Sensor
One is IRD-10 ,which can fly to 10m distance on the line of sight. IRD-30, which can cover up / down and
right / left side 120 degree up to 15m in straight direction, and IRD-60 called "Dome sensor" can cover 360
degree area reception up to 15m half-diameter.
Microphone/Transmitter
Three type of microphones, handheld, pendant and table top, are available depends on users' needs.
Handheld microphone IRH-15c utilize two emitters at bottom and top for transmitting audio in all around 360
degree direction. Up to 20m distance in line of sight can fly constantly.
High and low switch for selection of emitting power depends on the size of location and for extending the
life of battery.
T wo channel setting on IRH-15c,IRB-10c and IRN-10 can be switched to either channel on the spot by just
sliding switch.
IRB-10c allow speakers for hands free action thanks to pendant or body clip wearing. Use IRN-10 if the
speakers are installed on the ceiling by adjusting the mic gain.
Feature
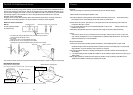
IRD-60 Sensor covering area
360 degree
Covering 120 degree
30m is covering
distance in frontside
15m is covering
distance in frontside
12
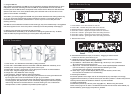
The IRD-10/30/60 External Sensor
To increase the working range of the system, up to three external sensors can beadded. External
sensors are powered by the receiver and can be plugged into the "EXT.SENSOR INPUTS" (9) on
the rear panel. Plugging into inputs 1 and/or 2 (9) adds to the built-in front sensor (3) and extends
the working range by 15m with IRD-10, 15m in straight direction with IRD-30 and 15m half-
diameter range in 360 degree.
Plugging into input 3 (9) automatically disconnects the front panel sensor. Thisway, if the front
panel sensor is blocked (perhaps in a secured cabinet or closet) it canbe replaced.
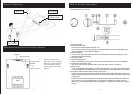
Guide for sensor installation
IRD-10
Fix the installing bracket
by screws firmly.
1, The black color side should face the near side when fixing the bracket.
Vend the bracket 90 degree to front.
2, Fix screws
Screw pitch: 30mm and 24mm Black color side
3, Slide the sensor unit for hooking up to the bracket.
Adjusting the angle of the bracket for sliding the sensor much easily.
The microphone emitter and sensor top surface face vertically is best position. Adjust the angle for suitable angle.
IRD-30/IRD-60 Installation
IRD-30 Sensor covering area:
Connection cable is not attached as standard items. Buy coaxial cable 3C-2V or 5C-2V.
Up and down direction and both side, each120 degree
Vending point
Attached screws for wood wall
Holes for screwing
Bracket
IRD-10 sensor
Emitter
Wall