


6
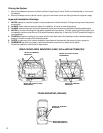
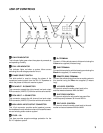
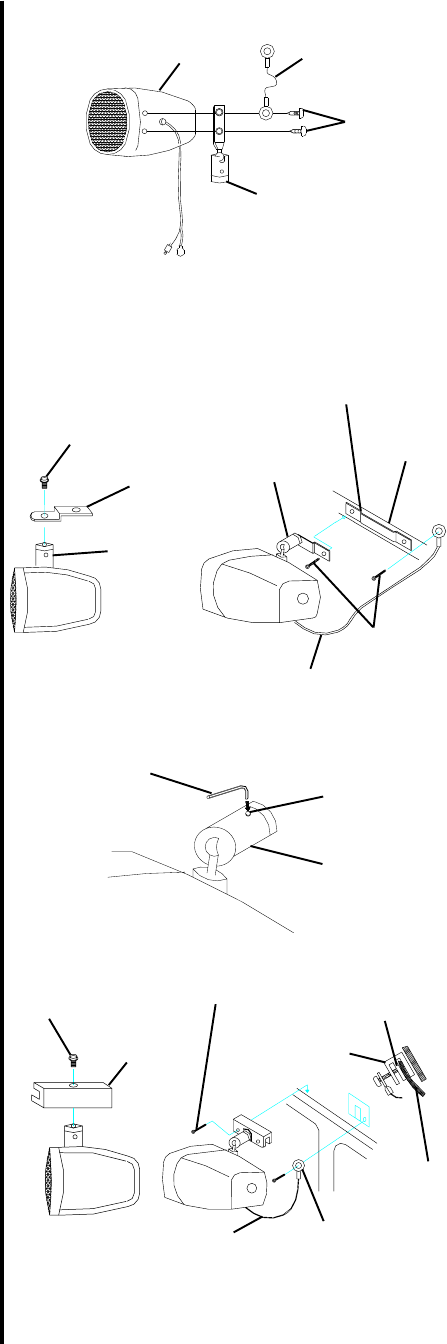
SATELLITE TWEETERS CONFIGURATION:
Normally, the satellite tweeter each is supplied with the bracket
and lanyard wire attached as shown in the drawing to the right. If the
speaker is not assembled as shown, assemble the swivel bracket
and lanyard to the speaker as illustrated. The bracket, lanyard and
screws are packed with each speaker.
SATELLITE TWEETERS
The two satellite tweeters supplied with the system are intended
for mounting inside the vehicle interior; they can be mounted
several different ways.
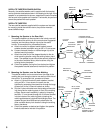
1. Mounting the Speaker to the Rear Wall:
The satellite tweeter can be mounted to the interior rear wall
on each side of the vehicle, aft of the rear window. Suggested
locations are the clothes hangar clip and/or the assist
handle. To accomplish this, proceed as follows:
a. Attach one end of a stepped metal bracket to each
speaker bracket as shown using an M5 x 10 mm screw.
b. Loosen the assist handle or clothes hangar clip at the
desired mounting location.
c. Attach the other end of the stepped bracket to the de-
sired mounting location using the existing factory hard-
ware. The speaker lanyard should be securely attached
to the other available factory hole locations using the
existing factory hardware.
d. Orient the speaker (facing front) as desired and tighten
the speaker bracket setscrew to maintain this position.
2. Mounting the Speaker over the Rear Molding:
Thesatellite tweeter can be mounted over the edge of the
molding that runs along the interior rear wall on each side of
the vehicle. To accomplish this, proceed as follows:
a. Attach a U-channel bracket to each speaker bracket
using an M5 x 10 mm screw; the screw can be
tightened by extending the screwdriver through the large
access hole in the U-channel bracket as shown.
b. Slip the U-channel bracket over the top edge of the mold-
ing; then slide the retaining plate in front of the molding
surface. Secure each assembly in place by threading
two M6 x 12 mm screws through the U-channel bracket
into the indents of the retaining plate, clamping the
retaining plate securely against the molding surface. The
speaker lanyard should be securely attachedto the
other available factory hole locations using the existing
factory hardware.
c. Orient the speaker as desired and tighten the speaker
bracket setscrew to maintain this position.
U-CHANNEL
BRACKET
M5 X 10
PAN HEAD
SCREW
M6 X 12 SOC
HD SCREW
LANYARD
RETAINING
PLATE
WINDOW
MOLDING
CLAMP
BRACKET
(REF)
EXISTING MOUNT
LOCATION IN VEHICLE
5 X 10mm
SCREW
STEPPED
MOUNTING
BRACKET
SPEAKER
BRACKET
(REF)
LANYARD
SPEAKER
BRACKET
WINDOW
MOLDING
SPEAKER
BRACKET
HEX ALLEN
WRENCH
BRACKET
SETSCREW
TO CLOTHES
HANGAR CLIP OR
ASSIST HANDLE
EXISTING
VEHICLE
HARDWARE
SATELLITE TWEETER CONFIGURATION
SPEAKER BRACKET
LANYARD
BRACKET
MOUNTING
SCREWS
SATELLITE
TWEETER