


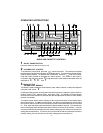


bq REWINDBUTTON(REW)
Pushing the Rewind button will cause the tape to move rapidly in the reverse direction of play.
To stop Rewind movement, lightly push the Fast-Forward button bp until the mechanism
disengages and normal play resumes.
br PROGRAMSELECTOR
To manually reverse tape direction and play the other side (program) of the cassette, lightly
push both the Fast-Forward bp and Rewind bq buttons at the same time.
bs EJECTBUTTON
Tape playback is stopped and the cassette is ejected by pushing this button. Radio or CD
changer operation will automatically resume when the cassette is ejected, depending on
which mode was in operation prior to cassette play.
bt MODESELECTOR
This button is used to select the audio source in play. During tape play, it can be used to
change to radio play without ejecting the cassette. Similarly, it can then be used to go back
to tape operation from radio play.
bu TIME/FREQUENCYSELECTOR(T/F)
During radio operation, press this button to call the time display on the incorporated quartz
clock. Pressing the button again or activating any tuning function will return to frequency
display.
During CD changer operation, press this button to call the time display or return to disc and
track indications.
cl RE-SET BUTTON
A re-set button is located on the front panel which must be activated by a pen tip or other thin
object as it is recessed to prevent accidental engagement. The re-set circuitry is provided
to protect the microprocessor circuitry and should only be activated under the following
circumstances as it will erase the time and station pre-set memories.
1. Upon initial installation after all wiring is completed.
2. If there is a malfunction of any of the switches on the unit, pressing the re-set button may
clear the system and return to normal operation.
SETTING THE CLOCK
1. Switch the vehicle ignition and the radio “on”.
2. If the radio frequency is shown on the display panel, press the Time/Frequency Selector
(T/F) bu momentarily so that the time display is shown.
3. With the time on the display panel, press and hold the Time/Frequency Selector
(T/F) for approximately 2 seconds until the time display begins flashing.
4. Within 5 seconds of the display beginning to flash, press the Manual Down Tuning ( )
side of button 9 to adjust the hours and the Manual Up Tuning ( ) side of the button
to adjust the minutes to the correct time.
5. After setting the correct time, press the Time/Frequency Selector (T/F) again or wait 5
seconds for the display to stop flashing.
-4-