


Quick Overview of System Operation
Thank you for purchasing this Audio-Technica 1800 Series Dual-channel Camera-mount UHF
Wireless Microphone System. All 1800 Series systems are designed primarily to be used with
video cameras, with the ATW-R1820 dual-channel receiver mounted on a camera and
connected to the camera's audio input; the systems may also be used with other components
equipped with microphone-level input(s).
This system is equipped with a dual receiver, which consists of two completely independent
receiver channels in a single unit, for simultaneous operation of two microphones.
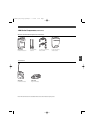
First, insert batteries (
see Battery Installation, page 8
). Note: The ATW-R1820 dual-channel
receiver also functions without batteries if connected to an external power supply
(12V DC source, 500 mA nominal current, not included).
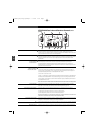
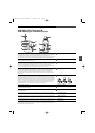
Next, attach the antennas to the antenna input jacks, and mount the ATW-R1820 dual-channel
receiver to your camera (mounting hardware not included); or use the included pouch with belt
clip to attach the ATW-R1820 to your belt. Connect the output cable(s) to the ATW-R1820 and your
video camera (and/or audio mixer). (
See Output A, Output B, and Output Select Switch, page 7.
)
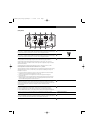
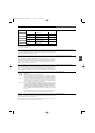
Turn the ATW-R1820 Power Switch on. Choose ”1” to activate only Receiver Channel 1 and Output
A (Power/Peak LED 1 should light red); this option will increase useable battery life. Choose ”Both”
to activate both receiver channels and both outputs (Power/Peak LEDs 1 and 2 should light red).
(
See Power Switch with four positions: External, Off, 1, Both, page 6.
)
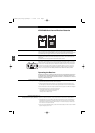
Select a frequency for Receiver Channel 1 and Receiver Channel 2. (
See Selecting Frequencies on
your Receiver, page 8.
)
NOTE: Receiver Channel 1 and Receiver Channel 2 must be set to different frequencies to
avoid interference. Transmitter-Receiver pairs must be set to identical frequencies: set
Transmitter 1 to the same frequency as Receiver Channel 1; set Transmitter 2 to the same
frequency as Receiver Channel 2.
If your system is equipped with a UniPak™ Body-pack Transmitter : Plug your wireless essential
microphone (not included) into the UniPak body-pack transmitter(s). Turn the power on, select a
frequency and choose other settings. (
See Operating the Transmitter, page 12.
)
If your system is equipped with a Plug-on Transmitter:
Attach a microphone (dynamic or condenser) to the plug-on transmitter’s input connector
(
see Microphone Input, page 11)
. The transmitter provides power to condenser microphones rated
to operate on 12V phantom power or less. Turn the power on, select a frequency and choose
other settings. (
See Operating the Transmitter, page 12.
)
5
E
N
OM1800Ser_dual(europ).qxd:Layout 1 1/10/07 14:35 Page 5