Owner’s Enjoyment Manual
AudioControl®
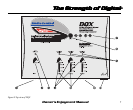
A GUIDED TOUR OF DQX
1) Inputs: The DQX has two RCA inputs that need
to get their audio signals from the main source unit.
If your source unit has multiple outputs (like a front,
rear, and/or subwoofer) you should only connect the
front or rear outputs to your DQX.
2) Input Level: This knob allows you to maximize
the signal level from your source unit that goes into
your DQX to achieve maximum signal to noise. Keep
in mind, that despite what the literature says, most
aftermarket source units produce a relatively low
voltage signal when it comes to playing music at
normal levels.
3) Input Maximized Indicator: This nifty LED
light indicates that you are supplying the DQX its
maximum amount of signal voltage. If the LED
indicator never comes on, don’t assume that it is not
working (since LED’s rarely break) but you might
consider adding a line driver to your system.
4) Output Level Controls: Although your DQX
has the ability to increase your signal voltage, your
amplifiers may not necessarily accept that much
signal. These controls allow you to regulate the
proper amount of pre-amp signal from the DQX to
the amplifiers.
5) Equalization Overload Indicator: This
convienient LED indicates when the DSP (digital
6
signal processor) of your DQX is clipping or distorting.
The usual cause of this is having the “Input Level”
turned up too high or you have boosted too many
frequencies on your equalizer.
6) Select: This allows you to select one of the various
equalization, crossover, or memory modes of your
DQX.
7) Navigation Arrows: These multi-function
buttons perform a number of functions, depending
upon which mode your DQX is in. You can do any-
thing from changing crossover frequencies to apply-
ing boost or cut to your equalization filters. However,
if you get the high score, you cannot enter your
initials!
8) Output Voltage Indicators: These brightly
colored LED’s indicate the level of signal voltage that
is coming out of the various outputs of your DQX.
9) Outputs: These RCA connectors should be con-
nected to the next components after the DQX, usu-
ally an amplifier. Do not connect any speakers
directly to your DQX or to any home appliances, like
your toaster.
10) Power Connections: This nifty connector is a
godsend to those who have tried to wire up their gear
with their body crammed in the trunk. You can wire
up the power, ground, and remote turn-on from the
convenience of outside your car and then casually
plug it into your DQX.


