


EnEn
EnEn
En
ENGLISH
6
EE
EE
E
(Españo(Españo
(Españo(Españo
(Españo
FF
FF
F
(França (França
(França (França
(França
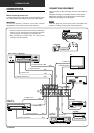
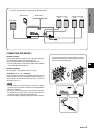
PREPARATIONS
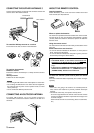
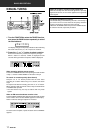
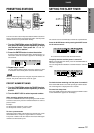
Operating AIWA CD or DVD players with the remote
control
You can control the basic functions of AIWA CD or DVD players
with the remote control. In principle, the buttons described below
have the same function as those on the DVD or CD players.
For more details, refer to the operating instructions of the player.
Operating CD players
Press the following button.
c/a(CD) - Starts or pauses playback.
f,g - Searches a track. Hold the button down.
r(CD),t(CD) - Skips a track. Press the button repeatedly.
s - Stops playback.
DISC SKIP(CD) - Skips a disc in the CD changer.
Operating DVD players
Press the following button while pressing the SHIFT button.
c - Starts playback.
f,g - Searches a track.
s - Stops playback.
i,k,j,l (up, down, left or right) - Moves the cursor to select a
program etc.
AUDIO - Changes an audio track (language etc.)
ENTER - Enters the selected program etc.
TITLE or MENU - Enters the title or menu screen.
RETURN - Returns to the previous mode etc.
DVD PAUSE - Pauses the playback of a DVD.
NOTE
There are some AIWA COMPACT DISC PLAYERs for which
some of the functions of the remote control do not work.
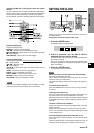
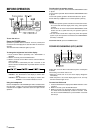
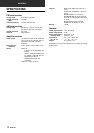
SETTING THE CLOCK
When the AC cord is connected for the first time, the clock on
the display flashes.
Set the time as follows while the power is off.
1 Press the ENTER button.
The display becomes a little brighter.
2 Within 4 seconds, turn the MULTI JOG to
designate the hour and the minute.
The time advances by turning it to the right, and decreases
by turning it to the left.
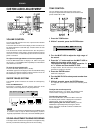
The N or M button on the main unit is also available. Press
the button repeatedly. To change the time rapidly in 10-minute
steps, hold it down.
3 Press the ENTER button.
The clock starts from 00 seconds.
NOTE
When the clock is set for the first time after purchase
Everything on the display will clear.
This is because the power economizing mode of the unit is
activated, and is not a malfunction.
The power economizing mode can be canceled. See page 7 for
details.
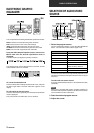
To correct the current time
Press the POWER button to turn the unit off. Carry out steps 1
to 3 above.
To display the current time
Press the CLOCK button while pressing the SHIFT button on
the remote control. The clock is displayed for 4 seconds.
When the power is off in the power economizing mode, pressing
the ENTER button on the unit also display the current time for 4
seconds.
To switch to the 24-hour standard
Display the current time, and press the BAND button on the unit
within 4 seconds.
Repeat the same procedure to restore the 12-hour standard.
In the 12-hour standard, “AM 12:00” indicates midnight and “PM
12:00” indicates noon.
If the clock display flashes while the power is off
This is caused by a power interruption. The current time needs
to be reset.
If power is interrupted for more than approximately 24 hours, all
settings stored in memory after purchase need to be reset.