


[
32
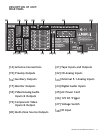
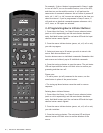
] Mute Button
In all modes, this button is preprogrammed to mute out-
puts of device. Mute does not affect recordings made
using the Tape outputs but will affect the signal going to
the Preamp Outputs. When the unit is in mute mode, any
adjustment of the Volume Control on the front panel [8]
will release the muting, i.e. the original volume level will
be resumed.
[
33
] Dynamic Range Button
In main mode, this button is preprogrammed to adjust
dynamic range of Dolby Digital encoded sources.
The d. range button, which can be used only in combina-
tion with a Dolby Digital source, incrementally reduces
the audio track’s dynamic range in four steps (100%, 75%,
50% and 25%) to allow for comfortable listening under
a variety of conditions. The normal or default position
is 100%. To adjust the dynamic range, each consecutive
press of the d. range button will reduce the value in 25%
increments, as shown in the alpha-numeric
display section.
Although we usually prefer to reproduce a source’s full
dynamic range (the difference between very loud and very
soft sounds), it may occasionally be desirable to reduce
the dynamic range. For example, when playing a movie
late at night, loud explosions might wake sleeping family
members. Simply turning the volume control down would
probably make a whisper in the next scene inaudible. The
d. range button solves this dilemma by progressively low-
ering the volume of loud peaks while increasing the level
of softer sounds.
[
34
] Volume Up/Down Buttons
In all modes, these buttons change the master
volume setting of the GTP-860. In all modes except main,
they can be reprogrammed with new commands. The
Volume control does not affect recordings made using the
Tape and Video, or Tape, Video 3 and Video 4 outputs but
will affect the signal going to the Preamp output.
[
35
] Mode Button
In main mode, this is preprogrammed to cycle through the
surround modes of the GTP-860. Pressing repeatedly will cycle
through Pro Logic, Hall, and Stereo, when available. Refer to
the Surround Mode description [12] for more information.
[
36
] Play Button
In CD mode, it is preprogrammed for play with an ADCOM
CD player.
[
37
] Pause Button
In CD mode, it is preprogrammed to pause an ADCOM
CD player.
[
38
] Stop Button
In CD mode, it is preprogrammed to stop an ADCOM
CD player.
[
39
] Arrow Buttons
The arrow buttons allow navigation throughout the GTP-
860 OSD (On Screen Display) menus (as well as the menus
of other devices, once the commands are learned). Please
refer to section 3.1 for further explanations on the OSD.
Left arrow: In main mode, this is preprogrammed to step
through the various choices you might wish to select while
a menu item is highlighted.
In CD mode, it is preprogrammed for audible reverse scan
with an ADCOM CD player.
Up arrow/Setup: In main mode, this is preprogrammed to
enter the OSD menu system, as well as scroll up to the
next choice on a menu screen.
Right arrow: In main mode, this is preprogrammed to step
through the various choices you might wish to select while
a menu item is highlighted.
In CD mode, it is preprogrammed for audible
forward scan with an ADCOM CD player
Down arrow: In main mode, this is preprogrammed to
scroll down to the next choice on a menu screen.
[
40
] Select Button
In main mode, this is preprogrammed to enter a selection
chosen via the menu system.
[
41
] Direct Access Keypad
(buttons “1” through “10,” and “+10”):
In CD mode, buttons are preprogrammed as track access
commands for the ADCOM CD player.
18 | ADCOM GTP-860 OWNER’S MANUAL