


7
to a menu screen while playing.
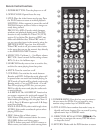
13. DISPLAY: Shows disc info, if disc supports this.
14. RECORD: Record singing (audio MP3 le only)
from CD/VCD discs or record MP3+G (A/V
les) from CD+G/MP3+G discs or les. You
can change the titles of the recorded les before
beginning to record. To rip a single le from
CD+G or MP3+G disc, press REC button to
start recording. To rip entire CD+G or MP3+G
discs to MP3+G les, press REPEAT button until
the screen shows REC ALL and then press the
RECORD button. e title of the songs cannot
be modied when ripping an entire disc.
PLAY/PAUSE: Press to begin playback of select-
ed Music source, or to close disc tray and begin
playing automatically. Press again to PAUSE.
When paused, press also to resume playing.
STOP: Stops Music playing.
MPX: Toggles among stereo, left and right chan-
nels for output.
15. NUMERIC KEYPAD: Direct entry of numbers
and letters. “0” key adds 10.
16. CANCEL: Clears current screen or eld entry.
17. RESERVATION: Puts song in waiting list.
18. REW (<<) and FWD (>>): REW will move the
play location back, FWD will move it forward.
PREV skips to previous track, NEXT skips to the
upcoming track.
19. SETUP: Press for SETUP menu.
EQ: Select from seven (7) types of equalizers or
dene your personal one.
REPEAT: Repeat a track or disc. (a) To repeat
a track, press REPEAT; the screen shows REP
ONE and the unit plays the current track. (b) To
repeat all tracks, press REPEAT until the screen
shows REP ALL. e unit plays all the tracks on
the disc.
N/P: Switches between NTSC and PAL TV out-
put formats. Press the button then press ENTER
within two (2) seconds to switch setting, conrm-
ing with the on-screen display.
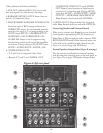
Player Connections
Refer to Figure A of the left rear panel, on the follow-
ing page, to acquaint yourself with the various Road-
wiz connections.
A/V Connection
Make sure all power is disconnected from each com-
ponent before connecting. Plug all cords securely to
prevent unwanted noise.
You cannot connect this player to a TV that does not
contain a video input jack. e player must be con-
nected to a TV or an amplier that is connected to a
TV or monitor. e TV or amplier must also contain
RCA audio input jacks (left and right channel).
Karaoke Connections
Refer to Figure A, left rear panel, on the following
page to acquaint yourself with the connections you
will need to use to set up your Roadwiz for Karaoke
use. First ensure that you have the correct cables for
the KARAOKE mode, for both video and audio con-
nections as shown below. In Figure A, Item #6 you will
see the stereo mix outputs for sending just the audio
program material plus subs to an external device for
signal processing, recording or other use.
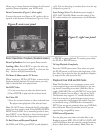
For SURROUND SOUND, see Figure A, Item #7 for
the various RCA connections you will make to your
assorted speakers.
Note: SCORE INPUTS support the scoring func-
tion from such outside audio inputs as ampliers and
receivers, or can be used as vocal inputs. Scoring only
works with discs, and only when a song plays. Score
is given at end of song. Make changes to the SETUP
menu before use, as follows:
SETUP > AUDIO SETUP > SCORE > ON
For VIDEO OUT, see Figure A, Item #8 for your op-
tions, which are Component (YUV), Composite and
S-video. ere is also have a digital OPTICAL audio
output you can use (Item #9).
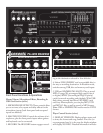
Back Panel Connections (see Figure A, next page)
1. XLR INPUT, KEYBOARD
2. XLR INPUT, GUITAR
3. AUX VIDEO RCA INS: ree (3) video inputs.
4. AUX AUDIO RCA INS: Stereo (L/R, white/red)
RCA cables connect here for Audio In.
5. AUX RCA OUTS: Composite signals Out, both