63
both the PC and the router are using the same
subnet mask.
ENABLING DYNAMIC DNS
A Domain Name System (DNS) server maintains a list of Internet
addresses and URLs (web addresses) and the IP address of the
computer that maintains the website. Usually, the IP address
for the host computer must be static. A dynamic DNS service
provides an alias for host computer that have dynamic IP
addresses.
You should enable the dynamic DNS feature if you have a
dynamic IP address from you ISP and you want to maintain an
Internet host on your network. Follow the steps below to enable
dynamic DNS:
NOTE: Before enabling the dynamic DNS feature, you must
have an account with a dynamic DNS service
provider.
1. Open a browser window and login to the router.
2. In the menu at the left side of the screen, click Basic
Configuration, then WAN, then Dynamic DNS. This
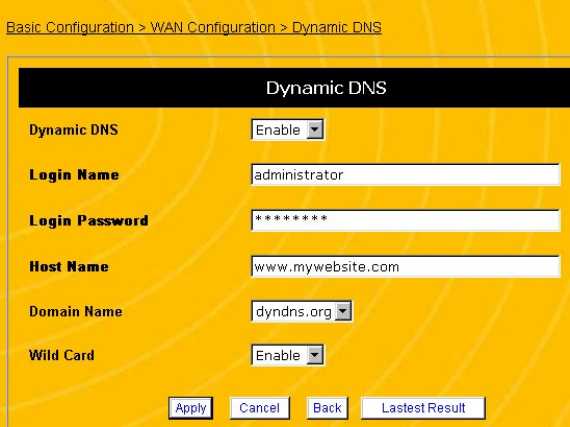
displays the Dynamic DNS screen (see Figure 27)
64
Figure 27 Dynamic DNS Screen
3. In the Dynamic DNS Field, select Enable.
4. Enter the Login Name and Login Password for your
dynamic DNS account.
5. Enter the host name of the domain. This is the URL that
users will enter to connect to your website.
6. Select the Domain Name of you dynamic DNS provider.
7. Under the Wild Card field, select Enable to allow wild card
lookups of your host name.
8. Click Apply. If the router displays a dialogue box that says
“Values are saved. Do you really want to reboot the system
now?” click OK. This will reboot the router and apply all
configuration changes.
