93
Editing Clip Lists
Chapter 4 Scene Selection
Editing Clip Lists
Reordering Sub Clips
Proceed as follows.
1
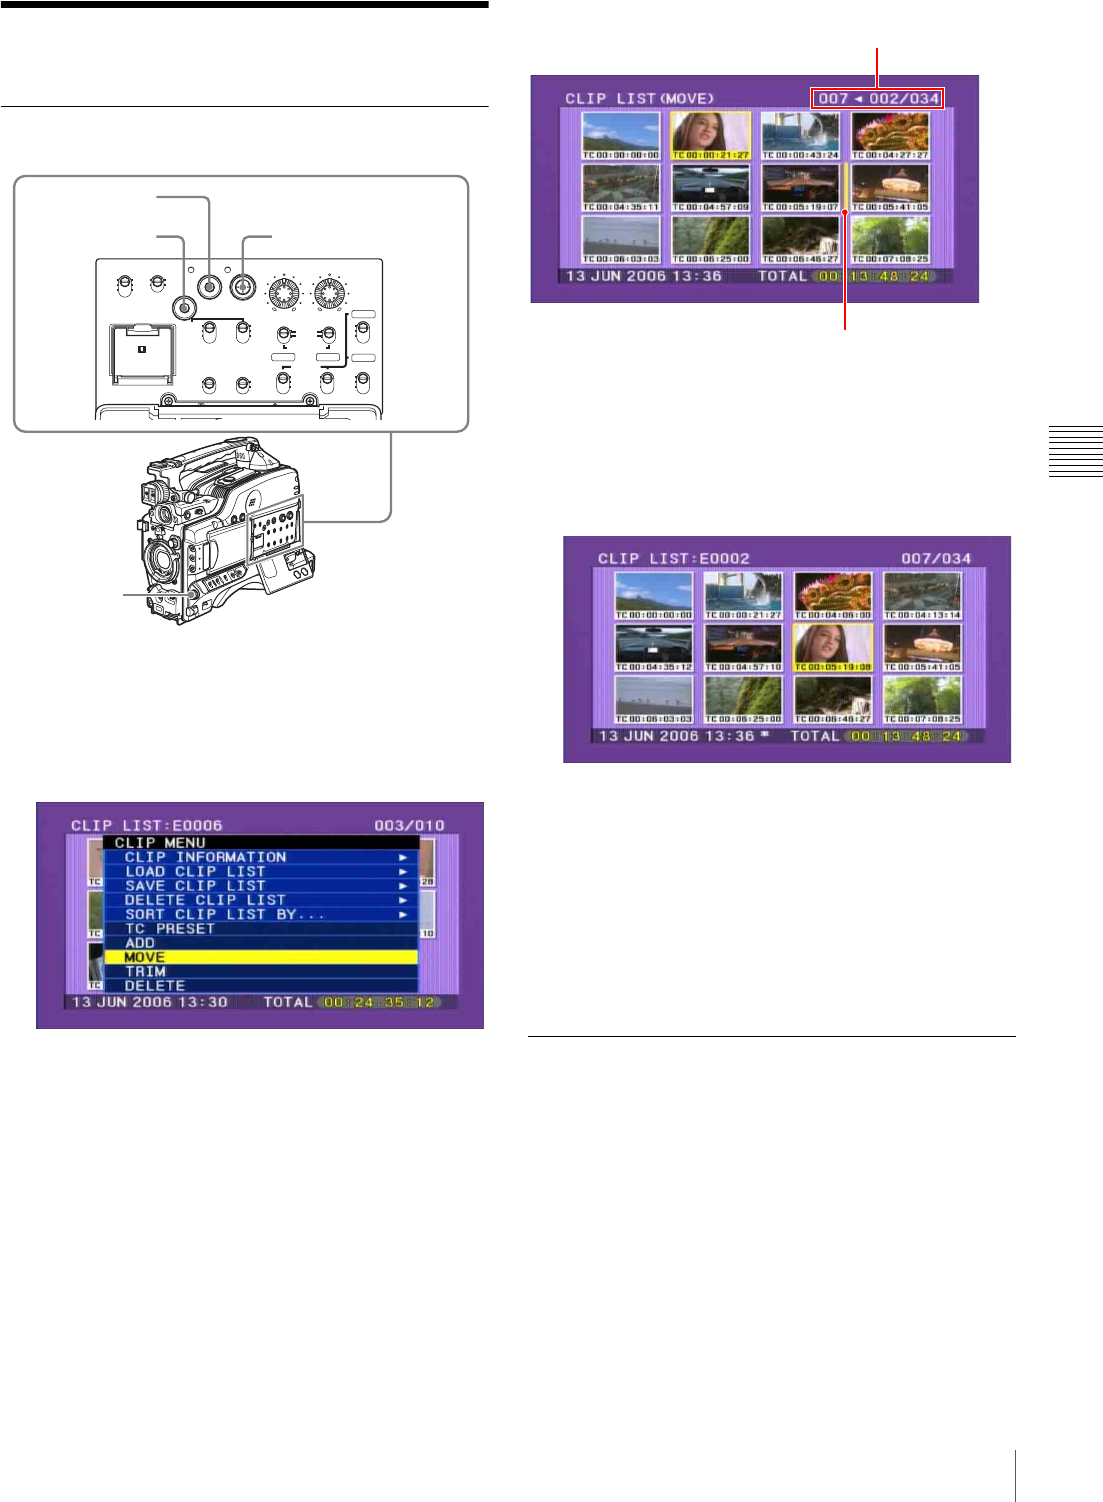
In the clip list screen, hold down the SHIFT button,
and press the SEL/SET button down (CLIP MENU).
The CLIP menu appears.
2
Use the SEL/SET button or MENU knob to select
“MOVE”, and press the button or knob.
This shifts to the MOVE screen.
3
Use the SEL/SET button (four-way arrow key) or
MENU knob to select the sub clip that you want to
move, and then press the button or knob.
To make a multiple selection, hold down the SHIFT
button, and turn the MENU knob.
An I-bar cursor appears, indicating the movement
destination.
4
Use the SEL/SET button or MENU knob to move the
I-bar cursor to the position to which you want to move,
and press the button or knob.
This changes the sequence of sub clips.
To continue moving sub clips
If you hold the SHIFT down when you press the SEL/
SET button or MENU knob, you return to step 3
instead of the CLIP menu after a clip is moved. This
allows you to continue moving sub clips
5
Save the contents of the current clip list to disc.
See “Saving the Current Clip List to Disc” on page 94.
Adjusting Sub Clip In/Out Points
(Trimming)
Proceed as follows.
1
Carry out step 1 of the procedure in “Reordering Sub
Clips” on page 93, to display the CLIP menu.
2
Use the SEL/SET button or MENU knob to select
“TRIM”, and press the button or knob.
This switches to the screen for selecting a thumbnail
for trimming.
CH-1
MIX
CH-2
CH-3
PRESET
AUTO
FRONT
WIRELESS
REAR
CH-1
MANUAL
AUDIO SELECT
AUDIO IN
F-RUN
REGEN
ON
OFF
SET
ON
OFF
CLOCK
F
W
R
F
W
R
R-RUN
MONITOR
FRONT MIC
LOW CUT
VIDEO OUT
CHARACTER
AUDIO LEVEL
THUMBNAIL SUB CLIP
MIX
CH-4
CH-1/2
CH-3/4
SHIFT
CLIP MENU
SEL/SET
010010
ESSENCE
MARK
CH-2
CH-3
CH-4
LITHIUM BATT
SHIFT button
SEL/SET button
THUMBNAIL
button
MENU knob
Indicates that 2nd sub clip will be
moved to position of 7th sub clip.
Cursor showing position to which
selected sub clip will be moved.
