


APPENDIX ➤ Information on HDMI En 101
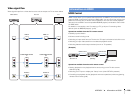
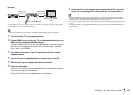
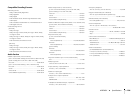
(Example)
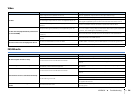
To use HDMI Control, you need to perform the following HDMI Control link setup after
connecting the TV and playback devices.
• This setup is required every time you add a new HDMI Control-compatible device to your system.
1
Turn on the unit, TV, and playback devices.
2
Enable HDMI Control on the unit, TV, and playback devices (such as
HDMI Control-compatible BD/DVD players).
To enable HDMI Control on the unit, set “HDMI Control” (p.74) in the “Setup”
menu to “On” and configure the related items (“TV Audio Input”, “Standby
Sync”, “ARC”, and “SCENE”).
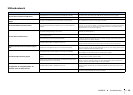
3
Turn off the main power of the TV and then turn off the unit and
playback devices.
4
Turn on the unit and playback devices and then turn on the TV.
5
Switch the TV input to display the video from the unit.
6
Check the followings.
On the unit: The input to which the playback device is connected is selected.
If not, select the input source manually.
On the TV: The video from the playback device is displayed.
7
Check that the unit is properly synchronized with the TV by turning
off the TV or adjusting the TV volume with the TV remote control.
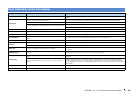
• If HDMI Control does not work properly, try unplugging the TV in Step 2 and plugging in the TV again in
Step 3. It may solve the problem. Also, HDMI Control may not work if the number of connected devices
exceeds the limit. In this case, disable HDMI Control on the devices not in use.
• If the unit is not synchronized to the TV’s power operations, check the priority of the audio output setting on
the TV.
• We recommend using TV and playback devices from the same manufacturer so that HDMI Control works
more effectively.
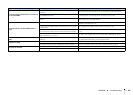
HDMI Control
Press SCENE (BD/DVD)
Turns on and displays
video from the playback
device
HDMI Control
Playback starts