


E-13
SELECTING THE SURROUND MODE
Press the SURROUND button to select the surround mode. Each time the
button is pressed, the surround mode changes as follows:
DOLBY PL
v
DOLBY 3
v
DOLBY D
v
DTS
v
THEATER
v
HALL
v
SURR OFF
v
DOLBY PL . . .
Note:
Some discs may restrict the selection.
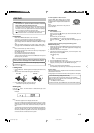
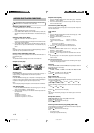
DOLBY PL: Dolby Pro Logic mode
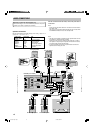
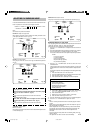
When playing a program source encoded with Dolby Surround sound
(video tape, laser disc, DVD, etc.) (Fig. A)
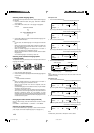
DOLBY 3: 3 channel mode
Using only the Front left, Center, Front right and Subwoofer speakers
(Fig. B)
DOLBY D:
Dolby Digital 5.1 Channel mode
When DVD disc encoded with Dolby Digital 5.1 Channel is played
back, you can select “DOLBY D”. (Fig. A)
Note:
Center or Surround speakers do not sound with some discs.
DTS:
DTS Digital Surround mode
When DVD disc encoded with DTS Digital Surround System
(5.1ch) is played back, you can select “DTS”. (Fig. A)
Note:
Center or Surround speakers do not sound with some discs.
THEATER: “Theater” effect
HALL: “Hall” effect
When playing a program source which is not encoded with Dolby Surround
or DTS sound (Fig. A)
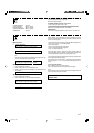
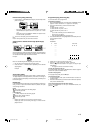
SURR OFF: Normal stereo sound
Using only the Front left, Front right and Subwoofer speakers (Fig. C)
Selecting Dolby Pro Logic mode
If you play a program source encoded with Dolby Surround or DTS sound
(video tape, laser disc, DVD etc.), follow the steps below.
Please use the remote control at the listening position.
1. Press the + or – VOLUME button to adjust the sound level from the
speakers.
2. Press the SURROUND button repeatedly until “DOLBY PL” appears.
3. Press the TEST button. “TTONE” appears and “FL” flashes.
The test tone will be heard from each speaker sequentially as follows:
TTONE
FL (Front left speaker)
C (Center speaker)
FR (Front right speaker)
RS (Surround right speaker)
LS (Surround left speaker)
4. Press the + or – VOLUME button until the test tone turns into a
comfortable level.
If the test tone level is not the same from each speaker, you may need
fine adjustment of the volume level. Please follow the steps as below.
Note:
If you make no operation, the original display returns after approximately
a minute.
1) Press the TEST button to turn the test tone off.
2)
Press the SURROUND button to select the desired surround mode.
3) Press the LEVEL button. “FNTL 0” appears.
4) Press the ENTER button repeatedly to select the speaker.
Display (Speaker)
FNTL (Front left speaker)
CENT (Center speaker)
FNTR (Front right speaker)
SURR (Surround right speaker)
SURL (Surround left speaker)
SUBW (Subwoofer)
5) Press the a or b button to adjust the volume level. (FNTL/FNTR:
“0” to “–10”, CENT/SURR/SURL/SUBW: “+10” to “–10”.)
6) Press the ENTER button.
7) Repeat step 4) to 6) for another speaker, if necessary.
8) Press the LEVEL button again to turn it off.
5. Press the TEST button to turn the test tone off. “TTONE” disappears.
6. Press the + or – VOLUME button to adjust the volume.
Notes:
- There is no Dolby Surround effect when monaural program material
is used.
- When receiving weak FM broadcasts, switch the Dolby Pro Logic off.
The sound quality may improve.
- When headphones are connected while any of the surround modes
are selected, the surround mode is switched off automatically. The
SURROUND button does not function while headphones are
connected.
- For other surround mode, please refer to “Selecting Dolby Pro Logic
mode” as above.
- This adjustment can be set at each source individually.
Surround
right
speaker
Surround
left
speaker
Subwoofer
Front
right
speaker
Front
left
speaker
Center
speaker
Fig. A
Fig. B
Surround
right
speaker
Surround
left
speaker
Subwoofer
Front
right
speaker
Front
left
speaker
Center
speaker
Surround
right
speaker
Surround
left
speaker
Subwoofer
Front
right
speaker
Front
left
speaker
Center
speaker
Fig. C
A3-60U-E (02.7.26)a 02.8.8, 3:38 PM13