


E-12
BASIC OPERATION
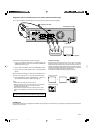
Turning the power on and off
Press the STANDBY/ON button. The STANDBY indicator goes out. (After
connecting the power cable, when you press the STANDBY/ON button for
the first time, the volume-reset feature automatically sets the initial volume
level.)
To turn the power off, press the STANDBY/ON button again. The STANDBY
indicator lights up.
- When the power cable is connected to the AC outlet, the unit can be
controlled from the remote control.
Direct start function
If the following buttons are pressed when the unit is in the standby mode,
the unit turns on automatically and the selected source is activated.
Main unit
, q
Remote control
, TUNER, q
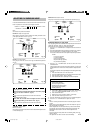
Selecting the source
Press the INPUT button to select the desired source. Each time the button
is pressed, the display changes as follows:
DVD
v
VIDEO 1
v
VIDEO 2
v
FM
v
AM
v
. . .
- When the source selection is changed, disc play is automatically
stopped.
Adjusting the volume
Turn the VOLUME control (or press the + or – VOLUME button on the
remote control). The volume level appears on the display (VOL 0 – VOL
39, MAX).
To reduce the volume temporarily (using the remote
control)
Press the MUTE button. The “MUTE” indicator flashes on the front panel
display. To restore the previous volume setting, press the MUTE button
again.
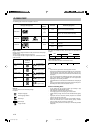
Bass extension
Press the BASS button to select the desired bass boost effect.
BASS OFF
v
BASS ON1
v
BASS ON2
v
BASS OFF . . .
Selecting the sound mode
Press the MUSIC button to select the sound mode matching the source to
be listened to.
POP: Pops, etc.
CLASSIC: Classical music, etc.
ROCK: Rock music, etc.
JAZZ: Jazz, etc.
What to do if...
If the operation of the unit or display is not normal,
1. Disconnect the power cable.
2. While pressing both BASS and MUSIC buttons on the main unit at the
same time, connect the power cable. “RESET” briefly appears on the
display.
3. Resume operation.
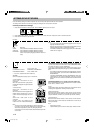
ADJUSTING THE CLOCK
(Using the remote control)
Example: To set “PM 6:30”
1. Press the STANDBY/ON button to turn the power on.
2. Press the SHIFT + 0 CLOCK buttons. “AM 12:00” flashes.
3. Press the SHIFT + 8 ADJUST buttons.
The hour display flashes.
4. Press the TUNING – or + button to set the “hours”.
5. Press the SHIFT + 8 ADJUST buttons.
The minute display flashes.
6. Press the TUNING – or + button to set the “minutes”.
7. Press the SHIFT + 8 ADJUST buttons. The clock starts.
- The time can be set accurately by pressing the SHIFT + 8
ADJUST buttons when a time signal is heard.
To display the clock during operation
Press the SHIFT + 0 CLOCK buttons. Press both buttons again to return
to the original display.
Note:
When the display flashes because of a power failure, reset the time.
A3-60U-E (02.7.26)a 02.8.8, 3:38 PM12