


GB GB
13
Please note You should now be able to move from room to room wearing the headphones without any
reception interference Should the signal break off or be disturbed, fine-tune the trans-
mission frequency again by turning the tuning knob (B9) (see section 4.2.3). When
receiving over long distances, the signal becomes gradually weaker. This is indicated by
an increase in background noise and the sound signal becoming almost inaudible.
Disturbances could possibly be caused by other appliances or interference. You should
then select a different frequency (A3) and repeat steps 4.2.2 and 4.2.3.
5 Batteries
5.1 Charging the rechargeable batteries supplied
1. The FMH 6050 comes with 2 rechargeable batteries (of the Micro AAA type), to be
charged before you use your new appliance for the first time.
2. First switch off the headset (B7).
3. Connect the battery-charger cable with the charging socket of the sender (A5), and of
the headset (B11). The charging indicator LED of the sender (A2) is lit with green
light.
4. Prior to first operation, the batteries have to be charged during approximately 14
hours. After this initial charge, the batteries will remain fully charged for about 8
hours. Please note that the batteries will reach their full capacity, and thereby the
operation time stated, only after the third charging operation.
Useful hints on battery maintenance
Perfect maintenance of your rechargeable batteries requires that you discharge / recharge
them about once per month with an appropriate charger. For this purpose, we recommend
chargers of the Vivanco product line. Regularly used, these appliances provide for longer
useful life of your rechargeable batteries.
5.2 Using batteries (rechargeable or one-way)
The wireless headset can also be supplied with commercially available rechargeable or
non-rechargeable 1.5V batteries of the AAA type. However, the built-in charging feature
does not support charging standard AAA Micro batteries.
1. First switch off the headset (B7).
2. Open the battery compartment (B12).
3. Replace used batteries with new or charged ones, making sure that you observe the
correct polarity (refer to the symbols at the battery compartment bottom).
Disposing of the batteries (rechargeable and one-way)
Consider the environment when disposing of rechargeable or non-rechargeable batteries,
which are not to be disposed of with household refuse. Take them to your local collection
point. Do not mix old and new batteries or different battery types.
12
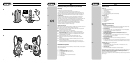
10 Power-on lamp
This lamp comes on red when the headphones are switched on and ready to use.
When the fine adjustment (tuning) of the transmitter is optimal, this lamp lights
green. If the lamp does not light, you must first charge the battery packs.
11 Battery pack charge socket
Connector socket for the battery pack charge lead.
12 Battery pack compartment
The two AAA batteries included with the set are inserted in this compartment.
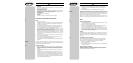
4 Connections / setting up components
4.1 Transmitter
1. Power supply unit for the transmitter (C)
Connect the power supply lead to the socket (A5) provided on the back of the
transmitter. Then plug the AC adapter into the mains socket.
2. Connection to the audio source
If your audio source is fitted with a jack socket (e.g. for headphones), use the audio
lead provided (E). Connect one end of the lead to the headphones socket and the
other to the audio input socket (A4) on the transmitter.
If the jack plug is too small for the headphones socket, you can use the adapter (G)
from 3.5 mm to 6.35 mm jack plug.
If your hi-fi or TV is not fitted with a headphones socket you can also use the phono
output (AUX) by means of the Y adapter. Make sure that plug and socket colours are
matched correctly (right = red, left = white).
The connection lines used (e.g. audio cable) should not be longer than 3 metres.
3. Now switch on your audio source (TV, hi-fi system, etc.), making sure that it is
emitting an audio signal.
When using adjustable headphone sockets, make sure that these are turned up high
enough (roughly in the middle position).
The transmission function is indicated by the red power-on lamp (A1).
Please note The transmitter automatically switches itself off when there is no audio signal for a
prolonged period or the input signal is too weak. The transmitter automatically switches
itself back on when there is an audio signal.
4.2 Headphones as receiver
1. Switch on the headphones (B7). Watch the power-on lamp (B10). If this comes on
red, your radio headphones are ready to operate.
If this lamp does not come on, you must first recharge the battery packs for the
headphones (see section 5.1).
2. Adjust the volume control (B8) to a medium setting and put on the headphones. First,
turn the tuning knob (B9) in one direction until you feel it catch. Then turn the tuning
knob (B9) slowly in the other direction until you can hear a clear sound signal (speech
or music). Your headphones are now set to the transmission frequency (A3) that you
previously set on the transmitter (section 4.1). When the fine tuning of the trans-
mitter is optimal, the power-on lamp (B10) lights green.
3. Still wearing the headphones, move approx. 3 metres away from the transmitter. If
you receive interference or other transmitters, turn the tuning knob (B9) again.
4. After use, switch the On/Off switch (B7) on the headphones to "Off".