


OPERATION
NOTES
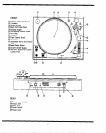
LPlace the record on the turntable mat.
2.Prese the power switch button provided at rear
panel to turn “ON” position.
%&move the stylus protector if cartridge is
detachable one.
4.Puah the start/stop button, then platter will start
to turn.
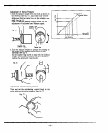
I Before detaching or attaching the headshell, be sure
to turn the power of the amplifier or mixer off.
0 Detaching or attaching of the headehcll with the
volume control turned up may cause damage to the
speakers.
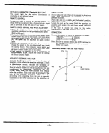
S.Move the tonearm position over the record.
&Put it down to the record, and play wili begin.
7.Move the tonearm to the armrest when play is
finished.
a Do not turn “ON” the power supply, wi’ch the
lurntable platter detached.
&Push the start/stop button, and platter will stop.
S-Turn off the power.
l When play is finished, be sure to secure the
tonearm with the arm clamp. Afler play is
finished. if the unit ie not+ to he IV& for aomu time,
care should be taken to secure the tonearm to
protect the stylus tip. For the same reason, the
stylus protector should also be attached.
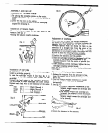
Note : A manual method of operation has been
chosen for the playing of records instead of
using “Cue Levers” _
The unit has been set to select 33-X rpm
automatically when the power button is
pressed to on. Push the 45 rpm speed select
button if you play 45 rpm record.
l Wipe the headshell terminals from time to time.
Dust and dirt at the headshell terminals may result
in increased “HUM” noise or intermittent sound.
Use a soft dry cloth to clean the headshell
terminals.
l Dust and dirt should be carefully removed from
stylus tip or records. Dust and dirt on the stylus
tip or record may not only result in deterioration
of tone quality, but alao cause undue wear of the
record and the stylus tip itself.
l ‘I’raneportatian of the unit to distant places for
removal and the like. Pack up the unit in the
reverse order to that for unpacking, using the
packing materials furniehed when the unit was
purchased. Should there be no such packing
materiala, be sure to take the foIlowing stepe.
Remove the turntable platter together with the
turntable mat, and wrap it up to prevent any
damage to them. Return the tonearm to the arm
rest, and affix it with tape or the like. Remove
the balance weight and the headshell/cartridge
from the tonearm and then wrap them up, to
avoid and damage to them. Wrap up the
turnrable base with a blanket or soft paper also
to prevent any possible damage to it.
SPECIFKATION
TURNTABLE
MOTOR
DIRECT DRIVEQWARTZ
STARTING UP TIME
o.sR?c (33Wrpm) 7v
STARTING TORQUE 1.&g * cm
BRAKING SYSTEM
ELEmRONIC BRAKE
RAMBLE (S/N RATIO) 76dB (IEC 98A WTD)
SPEED
33!&-pm, 45rpm
PITCH
&lo% (DETOUCHABEE 1oonDn FADER)
wow Br. FTn-rrER 0.03% W. R. M. 6.
ARM
TYPE
STATIC BALANCE SYSTEM
EFFECTIVE WGTH
23omo J;lmn
OFFSmANGLE
22'
OVERHANG
16mn
TRACKING ERROR A-2 22' -4-Q' 32'
ANTI SKATING
ADJUSTMENT RANGE O-7.0 B
1 STYLUS PRIBSUAE
ADJUSTMENT RANGE O-‘I.08
1 LIGHT(OPTKONAL,)
1 DETOUCBABLE MINI LIGHT DCl2volt lOOmA
SPEEDLOCK
REMO'PE
DYMENSION
WEIGHT
POWER
QUARTZ LOCK
MOMENTARY START (MINX JACK)
~W~460..X(N)15OnunX(D~370~
9.5ap
AC117V or 230V
-6-