TASCAM VL-S5
7
TASCAM VL-S5
7
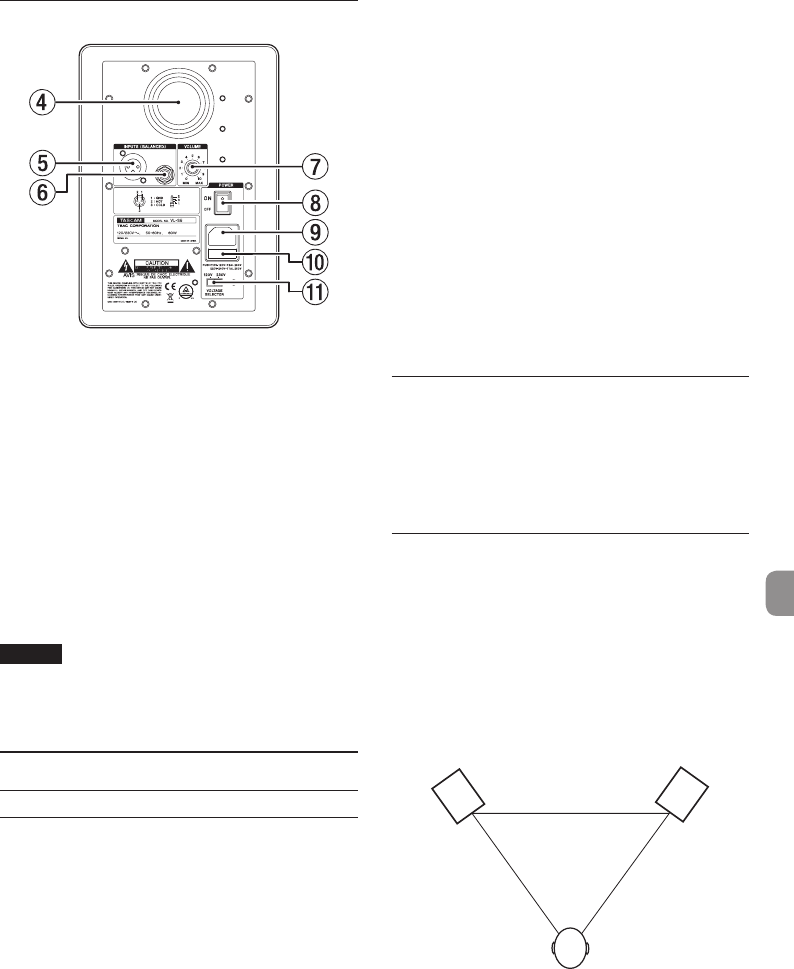
Rear panel
4 Ventilation port
5 XLR input jack
6 TRS input jack
7 VOLUME knob
8 POWER switch
9 AC IN connector
0 Fuse holder
This unit is equipped with a fuse.
If the unit does not work, disconnect the power
plug from the AC outlet and then contact
TASCAM Customer Support (see page 2).
q VOLTAGE SELECTOR switch
Switches the voltage to either 230 V or 120 V.
NOTE
•
The voltage selector is only available on units for
specific markets.
•
In North America, use a 120V power supply.
Preparation
Precautions before making connec-
tions
• When unpacking a speaker from its box, do not
hold it by its tweeter or woofer units.
• Connect signal cables and power cords so that
they will not become caught on anything.
• Before turning the built-in amplifier on,
minimize the volume of the input signal. Turning
it on while inputting a loud signal could damage
the speaker.
• Do not continuously use it for a long time at a
loud volume. Doing so could harm your hearing.
• This speaker system has been magnetically
shielded, but when used with some types of
televisions and monitors, the on-screen image
could be affected.
Before determining the final installation
position, try various installation configurations
and positions.
• Use power cords, power outlets, audio signal
cables and connectors that are undamaged and
free of wiring shorts and other defects.
• Set the power switch to OFF before connecting
the power cord.
• Do not input signals other than audio signals.
• Before connecting an audio signal to this unit,
confirm that the level of the input signal is
minimized and the power switch of the built-in
power amplifier is set to OFF.
• Always use the correct polarity.
Connections
1. Set the POWER switch to OFF.
2. Connect the included power cord to the speaker
and then to the power supply.
3. Input an audio signal to an input jack (XLR or
TRS).
Installation
Installing speakers correctly is extremely important.
The volume of low frequencies will seem to change
according to the positions where the speakers are
installed. Test various installation positions to find
the best places for maximizing the capabilities of the
speakers.
• For a stereo set up, place the speakers so that
they form an equilateral triangle with the
listening position.
LEFT RIGHT


