


3
Thank you for selecting Tannoy developed by our dedicated team of design engineers, they are the choice of discriminating music and movie
lovers the world over. Excellence is designed into our loudspeakers and electronics from the start. Careful selection of the very best components
combined with strict quality control procedures during the production process ensures this level of excellence is maintained. We feel confident
that you will enjoy your new Tannoy loudspeakers/electronics for many years to come.
Please take time to read the rest of this owner’s guide before using your loudspeakers/electronics to gain maximum effect from their use. Once
you have installed your new loudspeakers/electronics please complete and return the registration document – this does not limit your legal rights.
CONTENTS
INTRODUCTION
3.0 APPROVALS
2.0 WARNINGS
2.1 Important Safety Instructions
2.2 WARNING
2.3 CAUTION
7
OWNER’S MANUAL
INTRODUCTION
Many in-wall and ceiling loudspeaker are designed simply to reproduce sound without any consideration for ultimate audio quality
and vocal articulation. Not so with Tannoy installation products. Tannoy in-wall speaker systems are monitor quality speaker
systems based on the company’s expertise in the manufacture of premium quality cabinet loudspeakers and studio monitors.
The iwSA 500 amplifier was created specifically to maximize the inherent performance of your Tannoy inwall subwoofer. By carefully
matching the amplifier’s capabilities and performance criteria to the inwall subwoofer, Tannoy has enabled installers and end users
to carefully tailor the performance to the job at hand.
iwSA 500
2
3
4
4
6
7
5
6.0 CONNECTIONS
6.1 Input Connections
6.2 Connecting the Speaker
6.3 Cable Choice
7.0 OPERATION
7.1 Operation Precautions
8.0 PROTECTION FEATURES
8.1 Limiter Function
9.0 MAINTENANCE
10.0 TROUBLESHOOTING
11.0 WARRANTY
12.0 Technical Specifications iwSA 500
8
9
7
8
8
8
2.4 User Responsibility
2.4.1 Speaker Damage
2.4.2 Radio Interference
4.0 INTRODUCING THE iWSA 500
4.1 Unpacking
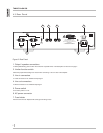
4.2 Front Panel
4.3 Rear Panel
5.0 INSTALLATION
5.1 Mounting
5.2 Operating Voltage