


POWER
OPERATION OF REMOTE CONTROL UNIT
LOADING BATTERIES
1. Remove the battery compartment cover.
2. Insert 2 “AAA” size (R03) batteries as indicated by the polarity marking. (Placing the
batteries in the wrong way around cause malfunction.)
3. Close the battery compartment cover.
OPERATION PROCEDURE
Plug the power cord of the system into an AC wall outlet, and press the POWER ON/ STAND BY
button on the remote control unit to turn the power on. When the power is turned on, press the key
of the source component to be operated.
NOTE:
• When the remote-controllable distance gets shorter than before, replace both batteries with
new ones.
• Malfunction may occur if direct sunlight or the light of a high-frequency lightning fluorescent
lamp enters the remote control light sensor. In such a case, change the system installation
position prevent the malfunction.
FUNCTION OF THE REMOTE CONTROL UNIT
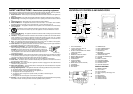
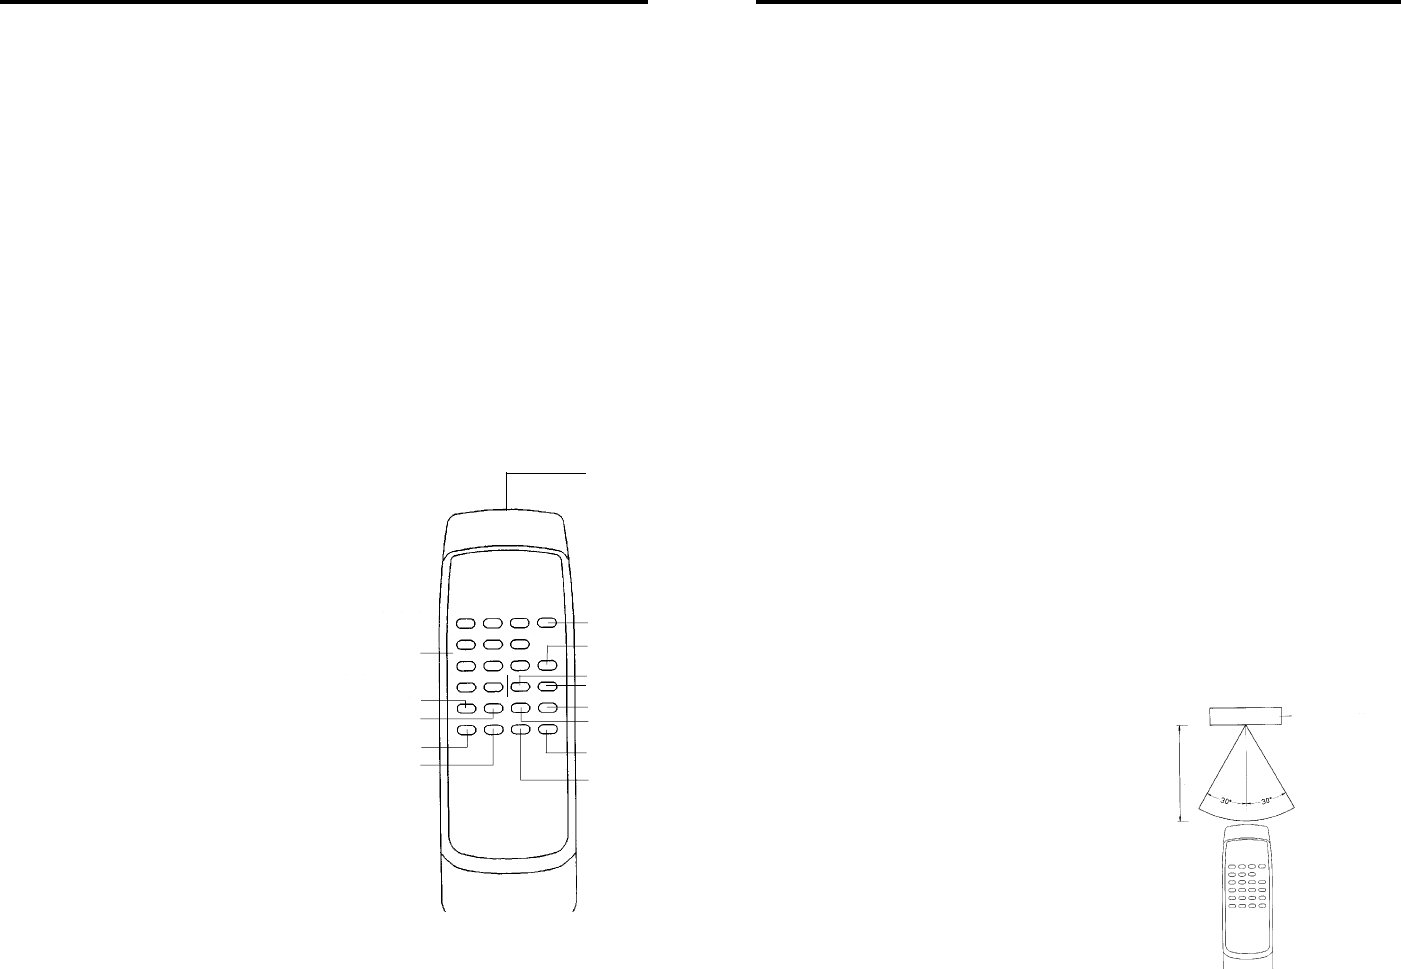
1. POWER ON/ STAND BY button
Press once to turn on the main unit and press
again to return to the “STAND BY” mode.
2. Volume control buttons
MUTE button: Press to mute the sound and
press again to restore the sound.
VOLUME button: Press to increase the
sound level.
VOLUME button: Press to decrease the
sound level.
3. CD/Radio/Clock adjustment operation
buttons
UP and DOWN buttons: TUNING/ CLOCK/
SEARCH
They have the same functions as the F. SKIP/
TUNING UP/ ADJ. and B. SKIP/ TUNING
DOWN/ ADJ. buttons [26 and 27] on the
main unit.
• for clock setting, see item 3 of “CLOCK
ADJUSTMENT”.
• For radio operation, see item 4 and 5 of
“RADIO OPERATION”.
• For CD operation, see “SKIPPING FOR THE BEGINNING OF A TRACK”, “SEARCH A
PARTICULAR POINT OF A TRACK” and “MEMORY PLAY”.
STOP button
It has the same function as the STOP button [4] on the main unit. See “COMPACT DISC
OPERATION”.
RANDOM button
Press to play the tracks in random order. Press again to cancel the selection.
MODE/REMAIN button
• In radio operation, press the button to change from frequency display to clock display and
press again to return.
• In CD operation, press the button to change the display from playing time to remaining time,
and then to clock display. Press again to return.
PLAY/ PAUSE button
It has the same function as the PLAY/ PAUSE button [1] on the main unit. See “COMPACT
DISC OPERATION”.
MEMORY/ C. ADJ. button
It has the same functions as the MEMORY/ CLOCK ADJ. button [5] on the main unit.
• For clock setting, see item 2 and 4 of “CLOCK ADJUETMENT”.
• For radio operation, see ‘PRESET STATION”.
• For CD operation, see “MEMORY PLAY”.
REPEAT/MEM. UP button
It has the same functions as the REPEAT/ MEM. UP button [6] on the main unit.
• For radio operation, see “PRESET STATION”.
• For CED operation, see “PRESET PLAY”.
4. RADIO/ CD numeric buttons
• In order operation, the numeric buttons can be used to enter the desired station directly.
• In CD operation, the numeric buttons can be used to enter the desired track directly. If the
track number or the number of selection is more than 19, follow the following examples.
– To enter 20 — +10 +10 0
– To enter 25 — +10 +10 5
5. Infrared light-emitting diode
Operating range:
12
13
Remote Control sensor
Approx. 6m
MUTE
VOLUME UP
VOLUME DOWN
PLAY/PAUSE
STOP
MODE/REMAIN
MEMORY/C-ADJ.
NUMBER KEYS
DOWN/B.SKIP
UP/F. SKIP
M-DN/RANDOM
M-UP/REPEAT
TRANSMITTER