


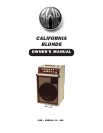


2 • CALIFORNIA BLONDE OWNER’S MANUAL
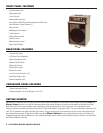
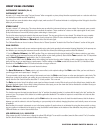
FRONT PANEL FEATURES
• Instrument Input Jack
• Stereo Input Jack
• Tuner Out Jack
• Balanced Mic Input Jack
• Gain Controls with LED Overload Indicator and Pull Phase
• Aural Enhancer Control (Channel 1)
• Bass Controls
• Mid Range Level Controls
• Treble Controls
• Effects Blend Controls
• Reverb Control
• Master Volume Control
• Power On/Off Switch
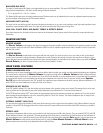
REAR PANEL FEATURES
• Line Fuse: 3A slo-blo
• A/C Power Cord Receptacle
• Stereo Headphones Jack
• Speaker On/Off Switch
• Effects Send Jacks
• Effects Return Jacks
• Balanced Line Out
• Line Out Jacks (Channel 1 or 2)
• Post-Reverb Return Jack
• Reverb Footswitch Jack
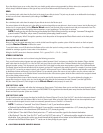
CROSSOVER PANEL FEATURES
• Tweeter Attenuator Control
• Extension Speaker Out Jacks (Speakon
and 1/4")
GETTING STARTED
Remove the AC cable from the accessory pack and connect it from the amplifier to a standard wall outlet. Make sure that the Gain and
Master Volume controls are set to the minimum position (fully counter-clockwise). Locate the power switch on the right side of the
front of the unit and turn on the amplifier. Upon powering up, don’t be surprised if you hear a small pop. This is absolutely normal.
Plug your instrument into the desired input jack (refer to “Front Panel Features” for greater detail). Turn your instrument’s volume up to at
least 75% of maximum and slowly adjust the gain control. Once you begin to play your instrument and you see the yellow light over the
gain control illuminate, back off the gain a bit. Now turn up the Master Volume and you should hear the sound of your instrument
amplified through the California Blonde. For more detailed information, please read the entire manual carefully so that you can fully realize
the California Blonde’s potential.