


SV Subwoofers
Page 11
The
LEVEL control is the amount of attenuation on the signal located at the center
frequency. MIN is equal to 0dB and MAX is equal to -12dB “cut”. Each hash mark
reduces the Center Point in question by 1.5dB.
The “FREQ” control (short for frequency) is the adjustment for the center point of
the cut and should target the highest peak frequency in the room’s response. Each
hash mark for this control moves the center frequency for the desired cut 5Hz within a
range of 20-80Hz.
Adjustments of the parametric equalizer.
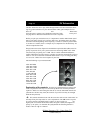
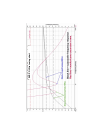
The first step to adjusting a
PEQ is determining the “Center Point” of the cut. Determining the Center Point al-
lows us to establish a target, or baseline, for further adjustments. In this example
(again, looking to the graph in Figure 3), the peak frequency is roughly 40Hz.
At this stage we’ll estimate the beginning (lowest frequency) and the end (highest fre-
quency) of the peak. In Figure 3 the beginning would be located somewhere near
25Hz and the end, or Highest Frequency, would be near 50Hz. This would be a 25Hz
bandwidth, with a Center Point located at 37.5Hz (the midpoint between 25 and
50hz). Notice that the center point of 37.5Hz is not located precisely at the peak fre-
quency in the response curve, which was estimated at 40Hz. Why? If we used 40Hz
as our center frequency and 50Hz as our high point cutoff we would only attenuate the
curve down to 30Hz. This will leave a small bump in response near 25Hz because the
correction would only be located between 30Hz to 50Hz.
Now that we determined the Center Point we can adjust the “FREQ” control knob to
37.5Hz, or between the fourth and fifth hash marks, clockwise from the left.
The next step will properly adjust the “Q” setting. We again need to use Fo rmula 1
and calculate the Q setting from Figu re 3 using Highest Frequency and Center Point
figures just determined above.
50Hz – 37.5Hz
= 0.33
37.5Hz
.33 Q or just past the third hash mark, clockwise from the left of this control.
Now that we have successfully adjusted the Q and Frequency controls, we need to
make the final Level adjustment. In Figure 3 the adjustment should be somewhere
near –10dB to –11dB, or on the 8th hash mark from the left (1.5dB cut per hash mark),
completing the adjustments for the parametric equalizer.
Measure room response for accuracy.
After all the adjustments are made
we need to measure the room again to make sure the adjustments are correct. If the
new response curve is not acceptable then fine-tune the adjustments. For example, if
the response curve still shows a small peak we would need to adjust the Level control
again to compensate. Make sure your overall SPL calibration is set as described earlier
in this manual and enjoy your optimized subwoofer!