


FADER CLEANING AND REPLACEMENT
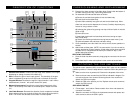
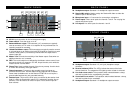
6. Crossfader Reverse: Reverses the direction of the crossfader. When
switched down, channel 1 will be assigned to the right side of the
crossfader, and channel 2 to the left side.
7. OS2 lock: Locks the OS2 in its current position to avoid accidentally
switching sources. Whether the OS2 is in phono or line, activating the OS2
lock will keep it there even if the OS2 is moved.
8. Cue Level: Controls the headphone output level.
9. EQ: Individual controls for low frequency, midrange, and high frequency
equalization with (+9dB/Kill) Note: Any changes made to EQ settings will
change the overall output level.
10. Cue Select: On this feature, PRE and POST refer to the crosfader. In
"PRE" position, the signal of control selected by the Cue pan fader will be
monitored (pre-line fader, pre-crossfader) as a stereo signal in the
headphones. The “POST” position, is somewhat similar to the “PRE”
position, except the signal is post crossfader (pre-line fader, post-
crossfader), so if the cue pan fader is centered, the signal received in the
headphone depends on the position of the crossfader. In "MASTER"
position, the signal monitored will be pre-master volume (post-faders),
meaning the signal will still be present in the headphone even if the Master
volume control is turned down.
11. Optical Scratch Switches (OS2): Switches between the phono and line
inputs.
12. Cue Pan: Fades the headphone output between channels 1 and 2,
effectively allowing the user to preview a mix. See cue select (10).
13. Power Indicator: The illuminated Allstar Beatdown logo also doubles as
the power indicator.
14. OS2 Lock Indicator: Indicates when the OS2 lock (7) is on .
15. Channel Fader: Controls the output level of each channel.
16. Input Level Meter: Monitors each channel’s input level.
17. Crossfader: Fades the overall mixer output between channels 1 and 2.
18. Headphone Mute: Mutes the headphones without having to move the
headphone volume knob.
M I X E R F U N C T I O N S
After constant scratching, the SA-5 faders may need to be cleaned and
lubricated from time to time. This will ensure long life and keep a smooth feeling
throughout the fader's lifetime. Follow the instructions below to lubricate and
clean your faders:
REMOVING A FADER:
1. Make sure mixer is powered off and power supply is disconnected from the
back of the mixer.
2. To remove the lower faceplate, take off all the fader knobs and then remove
the 4 screws located on the sides of the mixer (2 on each side). Lift up on
the faceplate and it will slide off.
3. Remove the fader to be cleaned or replaced by unscrewing the 2 outer
screws on the fader plate (removing the 2 inner
screws will detach the fader from the fader plate).
4. Disconnect the fader from the mixer by removing
the connector on the bottom of the fader.
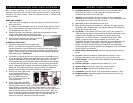
CLEANING A P&G FADER:
1. Remove 2 mounting screws from fader plate.
(NOTE: The P&G fader is designed with floating
mounting threads for precise mechanical centralizing of the fader. If you
desire to keep your fader`s current mounting position we suggest that you
make 2 marks on both ends of the fader on the fader plate to indicate the
P&G fader position.) See Figure 1.
2. Once fader is removed from the unit, remove the two screws (A) from the
end of the fader body where the wires exit the fader casing. Pull away the
end block. Withdraw the dust cover (B). Taking great care, remove the
slider assembly (C), ensuring that the wiper contacts (D) are not damaged
as this will affect the operation of the fader. Clean the slider assembly by
gently wiping the wiper contacts and slider bearings (E) using a tissue or
cotton bud. If the slider bearings are excessively worn, as indicated by
excessive slider rocking, then contact Stanton for replacement.
3. Remove the single upper screw
on the opposite end block to
remove the guide rail. Clean the
guide rail (F) with a tissue or
cloth, removing all traces of dirt
and contamination.
4. Remove the fader track (G) by
slowly withdrawing from the unit.
Place the fader track on a desk or working surface with black contacts
facing upwards. If necessary, the track can be washed in warm water,
wiped gently then dried thoroughly using a dry cloth. Use a lint free cloth or
swab to wipe the tracks and check for marks along the track. (Note: Lint
free cloth should be used to avoid dust and fibers being deposited on the
track). If the track appears excessively worn, or if cleaning does not
improve its operation, replacement may be necessary.
Figure 1
A
B
C
D
E
F
G