


6 7
LCD DISPLAY
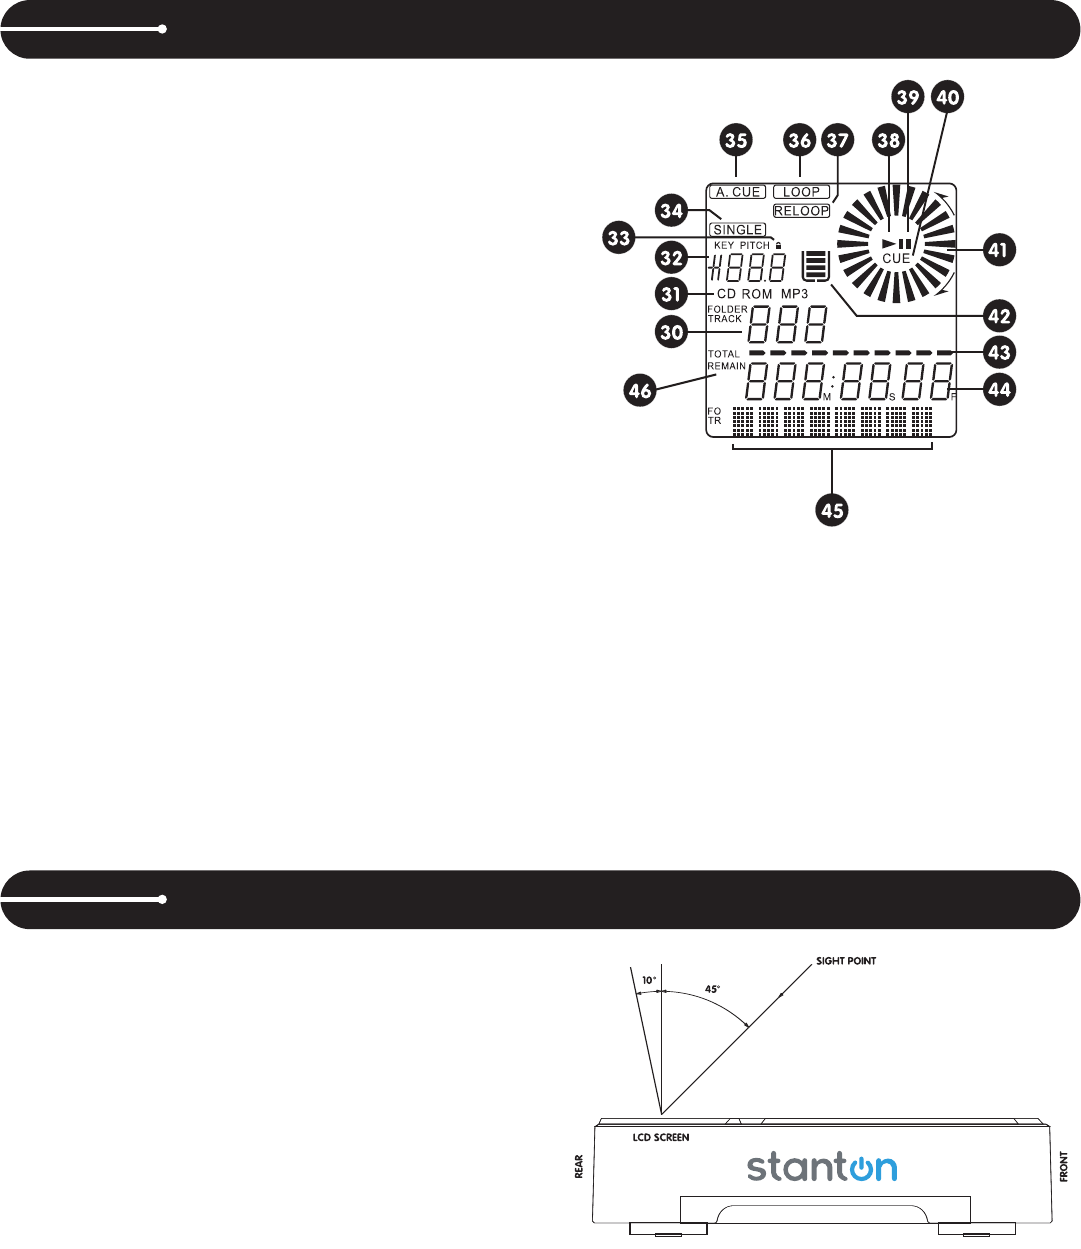
30. TRACK – Indicates the current track selected or being played.
31. CD/MP3 – Indicates whether the current disc is a standard audio disc
or an MP3 disc.
32. PITCH VALUE – Shows the percentage of the pitch slider.
33. LOCK – Shows when Pitch Lock and/or Key Lock are active.
34. SINGLE – Controlled by the CTN/SGL button, this indicates when the
unit is set to play just one track at a time. When this is not illuminat-
ed, the CD will play continuously through all tracks.
35. A.CUE – Indicates when Auto Cue is active. To activate Auto Cue,
press and hold the SGL/CTN button.
36. LOOP – Indicates when the CD is in loop mode.
37. RELOOP – Indicates when there is a previously set loop, and that the
loop is ready to be played again.
38. PLAY – Indicates when the unit is currently playing a CD.
39. PAUSE – Indicates the unit is in CUE or PAUSE mode.
40. CUE – Indicates the unit is at a cue point and is ready to play.
41. WHEEL INDICATOR – This is a visual representation of a vinyl mark-
er, which is traditionally used to mark the location of a certain sound
or cue point on a vinyl record. Here, it indicates the play position,
rotates during playback in either direction, and stops during cue or
pause mode. It also indicates the speed of the forward and reverse
search operation.
42. ANTI SHOCK AND BUFFER INDICATOR – Indicates the current sta-
tus of the buffer memory. This is represented on the display by a
bucket being filled or emptied. The bucket itself represents the instant
start function (which works by buffer memory). If the bucket is flash-
ing, the instant start is not available. Each bar within the bucket rep-
resents 2 seconds of anti shock protection. There is up to 10 seconds
of anti shock protection available.
43. TIME BAR – Shows a proportionate visual representation of the time
remaining or time elapsed.
44. TIME DISPLAY – Displays the time of track(s) currently selected in
increments of Minutes, Seconds, and Frames.
45. TEXT – The text portion of the display (the bottom row) is mainly used
to display MP3 file names or CD text information. It is also used to dis-
play various messages, such as effects parameter settings and more.
See operating instructions for further explanation.
46. ELAPSED / TOTAL / REMAIN – Indicates whether the time shown on
the display refers to total remaining time or track remaining time. If
either of these are not illuminated, this indicates elapsed track time.
SETUP
CHECKING THE CONTENTS – Check that the carton contains all of the
following items.
• Tabletop CD player unit
• Printed user’s manual
• One RCA cable
• One power cable
• One fader start / relay cable
INSTALLING THE UNIT
• Place the unit on a flat, level surface.
• Be sure the player is in a well-ventilated area where it will not be
exposed to direct sunlight, high temperatures, or high humidity.
• Try to place the unit as far as possible from Tvs and tuners, as the unit
may cause undesirable interference.
• The player will work normally when the unit is within 15 degrees of the
vertical plane. If the unit is tilted excessively, discs may not load or
unload properly, or playback may be adversely affected.
CONNECTIONS
• Make sure that the unit and any other equipment in the signal chain are
turned off prior to making any connections.
• Connect the RCA cable to the rear of the unit and to the input on your
mixer.
• Connect the power cable to the rear of the unit and to a proper AC out-
let.
OPERATING INSTRUCTIONS
UPDATING FIRMWARE
Checking Firmware Version
• Turn the unit off.
• Hold down the sample MODE while powering up the unit.
• Release MODE to go back to the normal playback mode.
Updating The Firmware
Firmware updates may, as necessary, become available from Stanton’s
website (www.stantondj.com) as downloadable ISO files, which are need-
ed to create a bootable CD. We recommend using Magic ISO Maker
(www.magiciso.com) PC software to burn the disc.
• Once you have burned a bootable disc from the ISO file, insert the CD
into the C.313. The display will read UPDATE, then SUCCESS.
• The unit will automatically eject the CD once the update is complete.
• Turn the unit off and back on to complete the update process.
OPENING AND CLOSING
Press the OPEN/CLOSE button to open or close the disc tray, or press the
PLAY button and the disc tray will close automatically. If the tray is not
closed after 60 seconds it will close automatically and enter pause mode.
The disc tray cannot be opened during playback. This prevents playback
from being interrupted if the OPEN/CLOSE button is pressed accidental-
ly. Stop playback by engaging cue or pause mode, and then press the
OPEN/CLOSE button.
LOADING DISCS
Hold a disc by its edges and place on the disc tray with the label side fac-
ing up. Do not touch the play surface (glossy side). CAUTION: DO NOT
place foreign objects on the disc tray and do not place more than one disc
on the tray at a time. Doing so may result in malfunction and damage of
the unit. DO NOT push the disc tray in manually, as this may also result
in malfunction and damage.
BURNING CD-R’s CD-RW’s
When burning CD-R’s or CD-RW’s for the C313, it is
strongly recommended to set your burner at 8x write
speed. You can change the write speed within your CD
burning software. Check the following links for specific
instructions:
• Windows: http://support.microsoft.com/kb/309522/en-us
• Mac: http://docs.info.apple.com/article.html?artnum=303599
SELECTING TRACKS
Whether using MP3 or standard audio discs, tracks can be selected in
one of two ways:
Searching
• Select the desired track by pressing the back or forward Search (21) but-
tons to move to the previous or next track. When a new track is selected
during playback, playback begins as soon as the track selection is com-
pleted.
Browsing
• Turn the BROWSE encoder to browse the list of tracks on the CD.
• While the track number is flashing, push down on the encoder to select
the track.
• If it is an MP3 disc with folders, use the FOLDER encoder to browse fold-
ers as desired.
• Pushing down on the encoder will enter or exit folders.
STARTING PLAYBACK
Press the PLAY/PAUSE button during the pause or cue mode to start
playback. The PLAY/PAUSE button illuminates with a solid green light
during playback.
STOPPING PLAYBACK
There are two ways to stop playback. Press the PLAY/PAUSE button dur-
ing playback to pause at that point, or press the CUE button during play-
back to return to the position at which playback started.
CUEING
Cueing is the action of preparing tracks for playback. When the CUE but-
ton is pressed, playback returns to the cue point and enters pause mode.
When the PLAY/PAUSE button is pressed during the cue mode, playback
starts. Playback can also be resumed from cue mode by pressing the
PLAY/PAUSE while holding the CUE button. This same action can be per-
formed on the memory pads.
Auto Cue
• The unit’s Auto-Cue function will automatically set the first cue point at
the beginning of each track. To return to that cue point, simply press the
cue button. To save that cue point, hit save and press any pad. If the
pad already has a cue point, it will be replaced.
• To turn Auto Cue on and off, hold down the SGL/CTN button. When
Auto-Cue is on, the display will show A.Cue
Setting Cue Points
There are several ways to set and recall cue points, either in real-time to
enhance a performance and create cool effects, or offline for fine adjust-
ments.
• During playback, press any empty memory pad to set a cue point on the
fly. The pad’s indicator will flash red while saving the cue point, and then
turn to green to show it is ready for playback. Press it again to return to
the cue point in real-time. Once the cue has been recalled, the indicator
will turn red to show playback was started from that cue point.
• During pause, use the jog wheel to find the right cue point. The unit will
repeat the same frame over and over, creating a stutter effect. This func-
tion is called Frame Search. While the CUE button is flashing, press it to
select the cue point
• During playback press the IN button to create a cue point on the fly. To
save it to a pad, press SAVE, then press the desired pad.
HINT: Anytime the CUE button is flashing, it means it is ready to save
a new cue point.
CAUTION
• Be sure to use the supplied cables. Using other types of cables may result
in unit damage.
• To avoid severe damage to the unit, be sure the power is OFF when mak-
ing any connections.
DO NOT POWER OFF UNIT WHILE DISC IS INSERTED
Removing the disc from the drive before powering off will insure
that the laser pick-up remains properly calibrated over time.
c313_manual.qxd 5/24/06 9:42 AM Page 6