


Page F-4
X-Rack Owner’s Manual
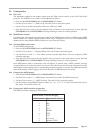
Optionally MIDI controllers can be mapped onto different Master module functions. To do this:
• Press and hold SETUP/MIDI until the SETUP/MIDI LED flashes.
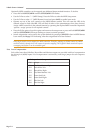
• Use the D-Pot to select ‘m1’ (MIDI Setup). Press the D-Pot to select the MIDI Setup menu.
• Use the D-Pot to select ‘le’ (MIDI Remote Learn) and press SAVE to enable learn mode.
• Operate any one of the ‘soft’ controls on the XR622 Master module. This will cause the LED of the
selected control to flash (the SEL LED will flash if either of the potentiometers have been chosen).
Assign a MIDI controller to the selected function by operating the required MIDI controller. Repeat the
‘operate – assign’ process for all required controls.
• Press the D-Pot again to leave this option and return to the setup menu or press and hold SETUP/MIDI
until the SETUP/MIDI LED stops flashing to return to normal operation.
• Switch assignments can be reset to the system defaults by pressing COPY/DEL when in MIDI Remote
Learn mode; the Empty LED indicating when the assignments have been deleted.
Only single controls can be mapped to a MIDI controller. Therefore, mapping an X-Rack control to a MIDI
controller which is already in use will remove the previous mapping. The original X-Rack control will require
re-mapping itself before it can be controlled again.
F.4.6 Level Compensation
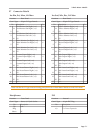
Each of the Insert Send, Mix Bus, Record Bus and Monitor outputs are provided with level compensation
for driving low (600Ω) inputs. Level compensation is activated by removing a jumper for each output as
follows:
600Ω Output Level Compensation
Link Output
LK1 Alt/Main Monitor Right
LK2 Record Bus Left
LK3 Record Bus Right
LK4 Alt/Main Monitor Left
LK5 Insert Send Left
LK6 Insert Send Right
LK7 Mix Bus Left
LK8 Mix Bus Right