


SR5IM1.DOC Page 2 of 9
IMPORTANT
• PLEASE READ THESE INSTRUCTIONS CAREFULLY BEFORE INSTALLING YOUR NEW
SPENDOR LOUDSPEAKERS
• DO NOT DRILL ANY HOLES OR FIX ANY SCREWS CLOSE TO ANY AC MAINS OR OTHER
ELECTRICAL CABLES
• DO NOT DRILL ANY HOLES OR FIX ANY SCREWS CLOSE TO ANY PIPES OR CONDUITS
• IF YOU ARE UNSURE ABOUT ANY ASPECT OF THE INSTALLATION CONSULT YOUR SPENDOR
DEALER OR A QUALIFIED PROFESSIONAL BEFORE PROCEEDING
• PLEASE READ THESE INSTRUCTIONS CAREFULLY BEFORE INSTALLING YOUR NEW
SPENDOR LOUDSPEAKERS
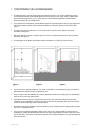
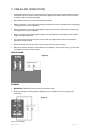
• The Spendor SR5 is designed to perform optimally when it is mounted on a wall.
• It must be fixed securely to a wall or ceiling using the supplied wall bracket.
• The wall bracket must be securely fixed using the supplied 3 x screws and 3 x wall plugs. The screws
must be fixed into a solid wall section. This can be brick, block or, if the wall is dry-lined (e.g. wallboard
or plasterboard), a structural timber ‘stud’ or ‘batten’.
• If the wall is dry-lined and there is no timber batten directly behind the bracket use a suitable expansion
fixing (not supplied). Expansion fixings are available from most hardware stores or builders merchants.
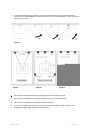
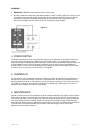
• If the SR5 is mounted very close to a corner or on a ceiling you can place a solid timber batten (spacer)
between the bracket and the wall to provide a greater range of adjustment. See figure 4. The spacer
can be up to 50mm thick. If a spacer is used, longer fixing screws (not supplied) will be required.
• For any other installation arrangement seek advice from your Spendor dealer.
• Install all loudspeaker cables before installing the bracket and allow at least 100mm of free loudspeaker
cable directly behind the loudspeaker terminals.
• Always position the cabinet as close to the wall as possible while allowing a clear gap of at least 2mm
between the cabinet rear edge and the wall face.
• Plan the layout of your room and all loudspeaker positions before installing any cables or brackets.