


OWNER’S MANUAL
SPEAKER PLACEMENT
Before installing your speaker, you should consider the placement carefully, taking into account the location of
electrical, plumbing and other fixtures. Contact your dealer for assistance if you are not sure of the best loca-
tion in your particular room environment.
Ceiling Placement: When placing your speaker into the ceiling, it should ideally be located above the pri-
mary listening area. The DT is intended to be used as a single stereo speaker in small listening environments,
walk-in closets, laundry rooms, bath rooms etc. In a large area, it may be necessary to place additional speak-
ers throughout the room to get the optimal effect.
MOUNTING SURFACE PREPARATION
New Construction - Unfinished Ceilings
A New Construction Bracket, SpeakerCraft part number BKT90611 (available from your dealer), may be
installed prior to drywall application across joists (up to 24" on-center) where a speaker will be located.
Insulation material should be in place prior to installing drywall. After the hole is cut and the drywall is
installed, the speaker can then be easily installed following the instructions for mounting under “Finished
Ceilings” below.
Finished Ceilings
Prior to the actual installation of the speaker, it will be necessary to run cables to the speaker location. See
your dealer for more information on cable installation. After the cable has been properly installed, you are
ready to mount the speaker. Following the simple steps listed below will result in a professional looking instal-
lation:
1. Determine the best area to mount your speaker. This area of the ceiling should be free of obstructions such
as electrical conduit, HVAC ducts, or water lines. This can best be determined by noting the placement of
fixtures and gaining access to an attic or crawl space for further analysis of the location of such obstacles.
2. Find the joists nearest the desired speaker mounting location. We highly recommend using a good stud-
finder tool for this procedure. If you are lining up the speaker to some other object or molding in the
room, make sure you consider the size of the baffle flange which extends beyond the mounting hole.
3. Mark the hole. A punch out template for setting the hole is provided in the box. Position the template in
the desired position and pencil an outline on the ceiling.
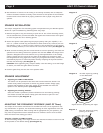
4. Cutting the hole. CAUTION: This is the most important part
of the entire installation. If you are not certain whether any
obstructions exist behind the desired mounting area, you
should start by cutting a small hole in the center of your
penciled mounting hole with a drywall saw, cutting at a 45º
angle towards the inside of the hole. (See Diagram 1)
Cutting the small hole at this angle will make drywall repair
much easier, using the piece cut out. Once you have deter-
mined that there aren’t any obstructions in your desired
mounting location, start cutting the finished hole at a 90º
angle to the ceiling’s surface.
AIM7 DT
Single Stereo Speakers
AIM7 DT One / AIM7 DT Three
PRINTER'S INSTRUCTIONS:
INSTR,INSTL,AIM DT • INK: BLACK • MATERIAL: 70LB GLOSS PAPER • SIZE: 8.500" X 11.000" • SCALE: 1-1 • FOLDING: HALF FOLD
Diagram 1