6
US
Getting Started
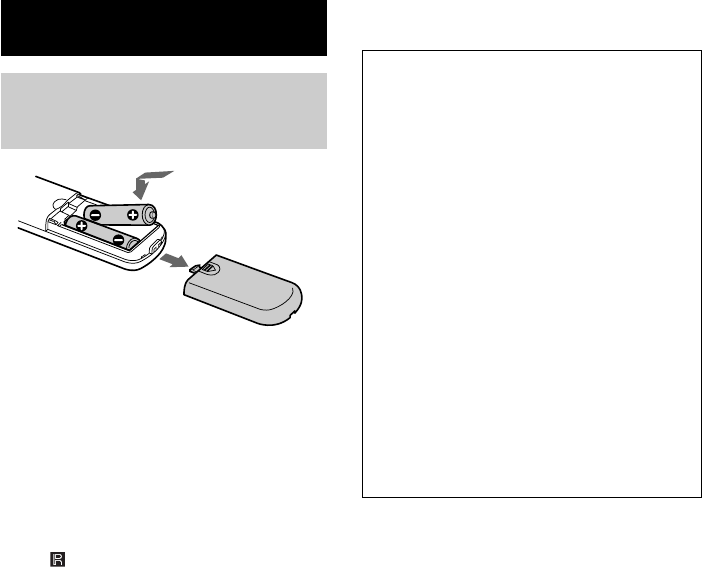
Inserting Batteries Into
the Remote Control
You can control the player using the supplied
remote.
Insert two R6 (size AA) batteries by matching
the + and – on the batteries to the diagram
inside the battery compartment.
Insert the negative (–) end first, then push in
and down until the positive (+) end clicks into
position.
When using the remote, point it at the remote
sensor
on the player.
Tip
When the remote no longer operates the system,
replace both batteries with new ones.
Notes
• Do not leave the remote near an extremely hot or
humid place.
• Do not drop any foreign object into the remote
casing, particularly when replacing the batteries.
• Do not expose the remote sensor to direct sunlight
or lighting apparatuses. Doing so may cause a
malfunction.
• If you don’t use the remote for an extended period
of time, remove the batteries to avoid possible
damage from battery leakage and corrosion.
Notice for Custom Integration
• When hooking a cable to an IR IN jack, the
IR feature of the Main Unit does not
function.
• The disc compartment may close when the
unit is being operated from other devices
via the IR IN jack while the disc
compartment is open.
Notice for connecting an CAV-
M1000ES
• Hook up the Audio output jack of this
player using the audio cable (supplied).
Do not use the digital output (optical) jack.
• Press CONTINUE for PLAY mode. If the
Main Unit is set to other than CONTINUE
mode, you cannot select a song from a CD
or operate the DISC SKIP feature from
another device.
The function which does not use the player
as a Custom Integration will be mentioned
after the above explanation.
Transporting the player
Before transporting the player, follow the
procedure below to return the internal
mechanisms back to their original position.
1 Remove all the discs from the disc tray.
2 Press A OPEN/CLOSE to close the
disc tray.
“no dISC” appears in the display.
3 Wait for 10 seconds, then press
POWER to turn off the player.


