


2
SONANCE CINEMA
®
SERIES
5. Cut the mounting hole using a keyhole or drywall saw, and
run the speaker wire from the mounting hole to the amplifier
location.
• Consult local building codes before running speaker wires
through walls.
Installation
Sonance Cinema Series speakers features an integral RotoLock
®
mounting system for quick mounting directly into existing walls.
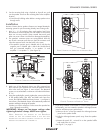
1. Strip ¼” – ½” of insulation from each speaker lead. Twist
the strands or tin the exposed wire with solder to ensure that
there are no stray strands. (Stray strands that touch each
other can cause a short-circuit that can damage the amplifier.)
2. The speaker’s connector posts are spring-loaded. Push the
top of each connector post down to open the connector and
insert the exposed wires into the holes in the posts.
• The speaker’s positive post is labeled with a red dot; the
negative post is labeled with a black dot. Double-check
that you connected amplifier “+” to speaker “+” and
amplifier “–” to speaker “–”. (See
Figure 4
.)
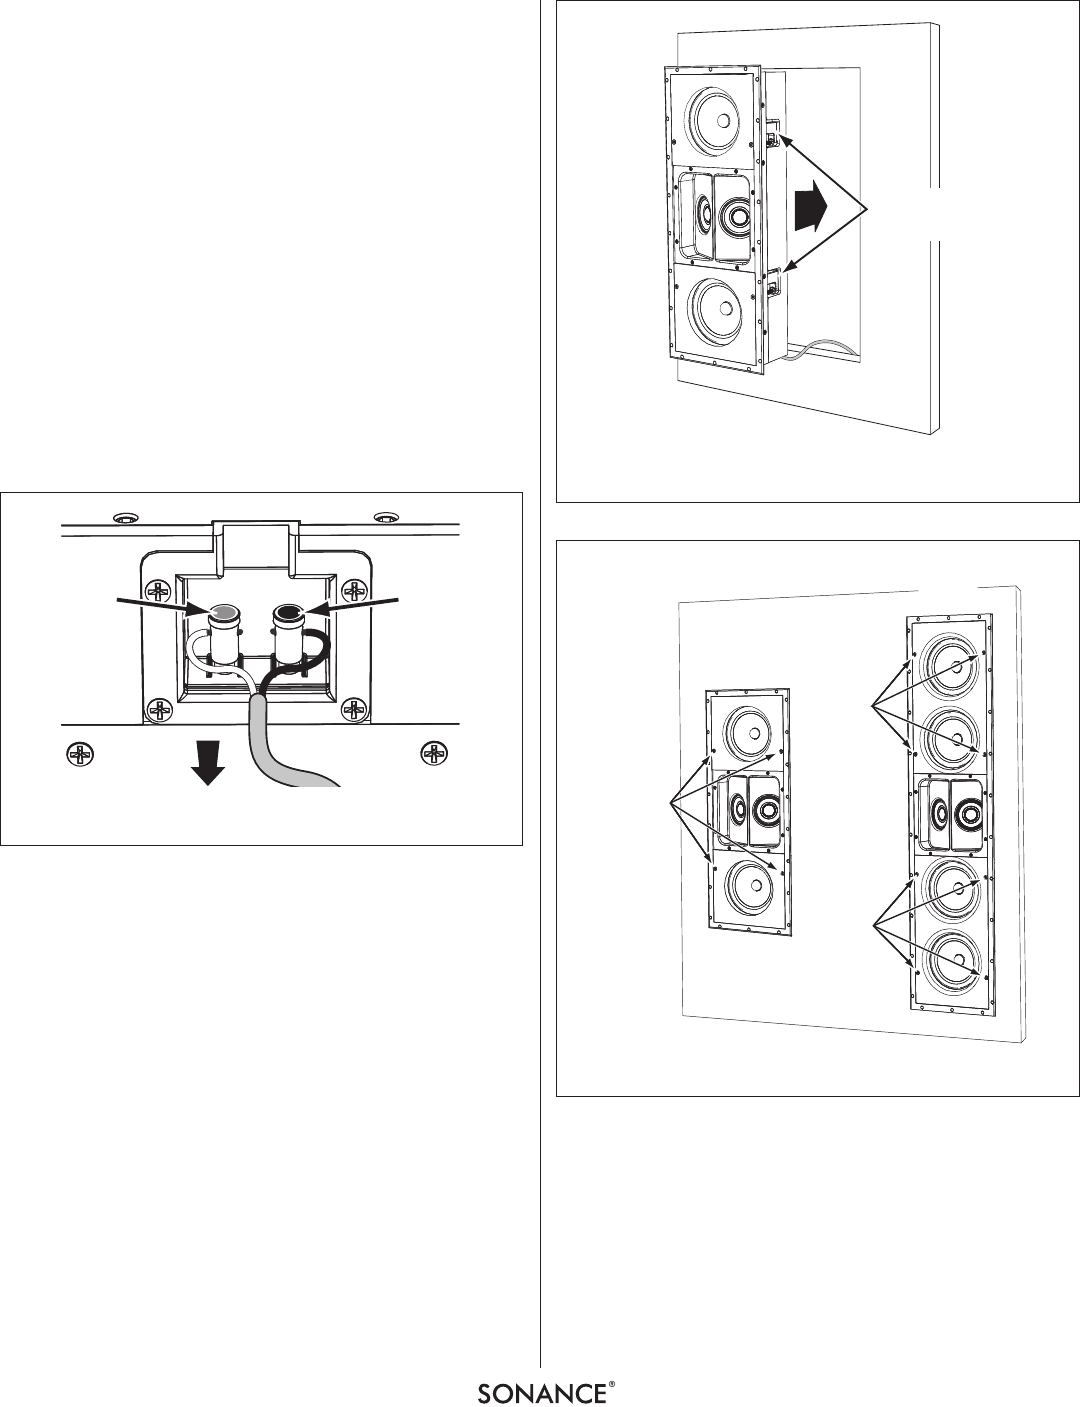
3. Make sure all the RotoLock clamps are fully retracted into
their recesses in the speaker box. Insert the speaker into the
hole in the wall (see
Figure 5
, next column). The RotoLock
system can accommodate a maximum wall material thickness
of 1¼”.
4. Using the supplied allen wrench, tighten the screws on the front
of the speaker baffle. (The LCR1 and SUR1 each have four
screws; the LCR2 and SUR2 each have 8 screws — see
Figure 6
,
next column.) The RotoLock clamps will automatically rotate into
position and begin clamping the speaker.
• When you notice resistance on the screws the speaker has
been clamped successfully.
IMPORTANT: Always use low-torque settings when
tightening RotoLock clamps; NEVER over-tighten.
NOTE: ADJUSTING THE TENSION OF THE ROTOLOCK
CLAMPS SO THAT THE SPEAKER FRAME IS FLAT WILL HELP
ENSURE THAT THE GRILLE CONTACTS THE WALL ALL THE WAY
AROUND THE SPEAKER FOR A PROPER FIT.
5. If you have installed Cinema SUR1 or Cinema SUR2 speakers
horizontally, you must rotate the speaker’s midrange/tweeter
panel to maintain proper performance:
a) Remove the six screws that attach the midrange/tweeter
panel to the speaker baffle.
b) Pull the midrange/tweeter panel away from the speaker
baffle.
c) Rotate the panel 90°, re-install it on the speaker baffle
and replace the six screws.
See
Figure 7
, on page 3.
RotoLock
®
Screws
RotoLock
®
Screws
RotoLock
®
Screws
LCR1
SUR1
LCR2
SUR2
F
IGURE 6: TIGHTENING THE ROTOLOCK
®
S
CREWS
RotoLock Clamps
(retracted)
FIGURE 5: INSERTING THE SPEAKER INTO THE MOUNTING HOLE
+
–
Front of
Speaker
Red Dot Black Dot
FIGURE 4: CONNECTING THE SPEAKER WIRE