


11
Home Distribution Kit Installation Manual
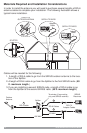
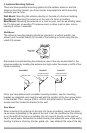
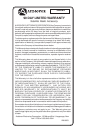
Slide one of the U-bolts through the holes at the top of the mounting bracket.
Then slide one of the mounting brackets over the two legs of the U-bolt.
Next, screw the hex nuts on each leg until they are snug. Do not yet tighten the
hex nuts beyond nger tight. Repeat this procedure with the other U-bolt. When
all the hex nuts are snug, verify that the antenna is facing the correct direction
and begin tightening each hex nut with a 3/8” wrench. Turn each hex nut one-half
turn and then move to the next hex nut repeating this one-half turn pattern until
all the hex nuts are equally tight. Tighten the hex nuts enough so that the anten-
na is secured to the mast or pole, but do not overtighten them.
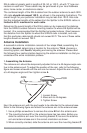
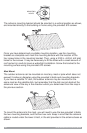
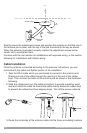
4. Adjusting and Aiming the Antenna
The pod portion of the antenna (where the SIRIUS logo is printed) needs to be
adjusted and aimed so that it is level and horizontal to the sky. As shown in the
following illustration, there are two possible adjustments that may be made on
the antenna to accomplish this: tilting the antenna pod itself (1), and adjusting the
antenna support arm (2), as shown.