


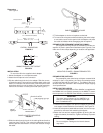


4
FRONT
SUPPORT
MICROPHONE
REAR
SUPPORT
CABLE AND
CONNECTOR
A98SPM
ASSEMBL
Y
FIGURE 10
4.
Mount the swivel adapter on the microphone stand.
5.
Attach the microphone cable to the 98-A98SPM.
6. Mount the Microphone-Polar Modifier combination in the
adapter
as in steps 3 through 5 of the
Installation
section.
7. T
o remove the microphone assembly from the swivel adapter
without disturbing the adapter and cable, reach into the open
slot
of the adapter and press the cable-lock button while
disen
-
gaging
the microphone.
8. NOTE:
The Microphone-Polar
Modifier assembly can be used
with or without its supplied acoustic foam windscreen. When
mounted
on the SM98A-A98SPM,
the windscreen not only pro
-
vides
excellent wind and pop protection, but helps protect the
A98SPM
internal element from contamination.
DISASSEMBLING THE PREAMPLIFIER (SM98A)
1. At the XLR connector end of the preamplifier, turn the slotted
head
setscrew fully inward (counterclockwise), and use a long-
nose
pliers to carefully withdraw the connector from the case.
2. Unsolder the three lead wires securing the XLR connector to
the
XLR board.
3. Remove all four Phillips-head screws from the preamplifier
case
(three on the switch side, one on the back).
4. Grasp the end cap and withdraw the cap assembly, pc board
assembly,
and connecting wires and jacks from the case.
REASSEMBLING THE PREAMPLIFIER (SM98A)
1. Make
sure
the pc board is seated in the slot of the end cap and
that
no wires are pinched.
2. Insert
the end cap-board assembly into the case, XLR connect
-
ing
wires first. Again, take care not to pinch
the wires connect
-
ing
the board to the end cap.
3. Rotate
the assembly inside the case until the four
holes for Phil
-
lips
screws line up with the holes in the case.
4.
Replace the four Phillips screws.
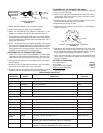
5. Resolder
the three lead wires to the back of the XLR board as
shown
in Figure 1
1.
RED
BLUE
BLACK
2
3
1
WIRING TO XLR PC BOARD TERMINALS
FIGURE 11
6. Replace
the XLR board-connector assembly in the case,
lining
up
the key in the
connector with the slot in the case. T
ake care
not to engage the butterfly-shaped ground contact in the key
slot
as it will prevent seating the connector properly
.
7. Insert
the connector fully in the case until the slotted setscrew
can be seen in the case hole; tighten the setscrew firmly by
turning it clockwise.
OPTIONAL ACCESSORIES
Drum Mounting Kit
A98MKS.
. . . . . . . . . . . . . . . . . . . . . . . . . . . . .
Horn
Clamp
A98KCS.
. . . . . . . . . . . . . . . . . . . . . . . . . . . . . . . . . .
Supercardioid
Polar Modifier*
A98SPM.
. . . . . . . . . . . . . . . . . . .
Windscreen
(for A98SPM)**
49A82.
. . . . . . . . . . . . . . . . . . . . . .
*Supplied with SM98A.
**Supplied with A98SPM.
REPLACEMENT P
ARTS LIST
Reference
Designation
Part
Number
Description
Commercial
Alternate
Preamplifier (SM98A)
A1 90B4220
ILP-1 Preamplifier Assembly
None
A2 90HZ2600 Pc Board Assembly None
MP1 66A264
Preamp Switch Cover
None
MP2 80A476
Mounting Clamp
All States 3/4-HNB
P1 95A8077 Plug Assembly
, Male, Miniature 3–Pin
Switchcraft TB3M
P2 90HV2600
XLR-3M Connector and Pc Board Assembly
None
Microphone
MK1 R134
Microphone Cartridge-Housing
None
MP3 49A66A
Windscreen, Microphone
None
MP4 A98SPM
Supercardioid Polar Modifier (optional for WM98)
None
MP5 49A82
Windscreen, Polar Modifier (optional for WM98)*
None
MP6 RK282
Swivel Adapter
None
P1 95A8077 Plug Assembly
, Male, Miniature 3–Pin
Switchcraft TB3M
Part of W1
(WM98)
WA330 Connector
, Female, Miniature, 4–Pin
Switchcraft TA4F
W1 (SM98A)
C107
Cable–connector assembly
, 4.6 m (15 ft), two-conductor
,
shielded, 3-pin (female) Switchcraft “T
ini Q–G” connectors
None
W1 (WM98)
90A4039
Cable–connector assembly
, 1.47 m (5 ft .), two conductor
,
shielded, 3– and 4–pin Switchcraft “T
ini Q–G” connectors
None