


5
System Connections
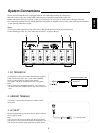
• Please be certain that this unit is unplugged from the AC outlet before making any connections.
• Be sure to observe the color coding when connecting the pre amplifier and speakers to this unit.
• Make connections firmly and correctly. If not, poor connections can cause loss of sound, noise or damage to the unit.
• For connections between this unit and the Sherwood compatible pre amplifier such as P-965, refer to the system connections
in the operating instructions of that.
Notes:
• Do not place other equipment on top of this unit so that the radiated heat can be properly dispersed.
• When installing in racks, etc., leave more than 30 cm(12˝) of space at the top.
ENGLISH
MODEL NO. A-965
7-CH POWER 7-CH POWER AMPLIFIERAMPLIFIER
MADE IN KOREA
DESIGNED IN USA
SER. NO.
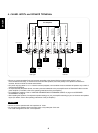
INPUT INPUT INPUT INPUT INPUT INPUT INPUT
SURROUND
BACK RIGHT
SURROUND
RIGHT
(4
-
8 )
CENTER
(4
-
8 )
SURROUND
LEFT
(4
-
8 )
FRONT LEFT
(4
-
8 )
FRONT RIGHT
(4
-
8 )
(4
-
8 )
SURROUND
BACK LEFT
(4
-
8 )
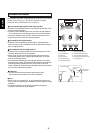
1. DC TRIGGER IN
In case that this unit is connected to Sherwood pre amplifier
P-965, connect this jack to the “1” jack of DC TRIGGER
OUTs of P-965 directly for system power control.
(For details, refer to the operating instructions of P-965.)
Note:
• When making DC TRIGGER connection, you should use
the stereo mini cord supplied with this unit, not a mono mini
cord.
2. GROUND TERMINAL
If necessary, connect this terminal to the “GND” of other
component.
3. AC INLET
Plug the supplied AC input cord into this AC INLET and then
into the wall AC outlet.
Note:
• Do not use an AC input cord other than the one supplied
with this unit. The AC input cord supplied is designed for use
with this unit and should not be used with any other device.
Sherwood pre amplifier P-965
1
2
DC TRIGGER OUT
To a wall AC outlet.