


|
28 English
Settings
Networks and the Internet
When you connect this product to a network, you
can use network based applications and functions
such as BD-LIVE and upgrade the product's
software through the network connection.
Configuring Your Network Connection
Before you begin, contact your ISP to find out
if your IP address is static or dynamic. If it is
dynamic, we recommend you use the Automatic
procedure below. If it is static, you must use the
Manual procedure that follows.
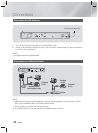
• Before you begin, confirm that the product is
connected to your router with a network cable.
❑
Automatic
To start the configuration process, follow these
steps:
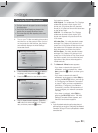
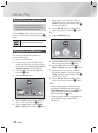
1 . In the Home menu, select Settings, and then
press the
E
button.
2 . Select Network, and then press the
E
button.
3 . Select Wired Network Settings, and then
press the
E
button.
The Wired Network Settings screen appears.
4 . Press the
►
button on the Internet Protocol
Setup menu.
Use
▲▼
button to select Auto, and then
press the
E
button.
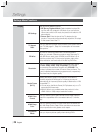
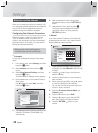
Settings
Display
Audio
Network
System
Language
Security
General
Support
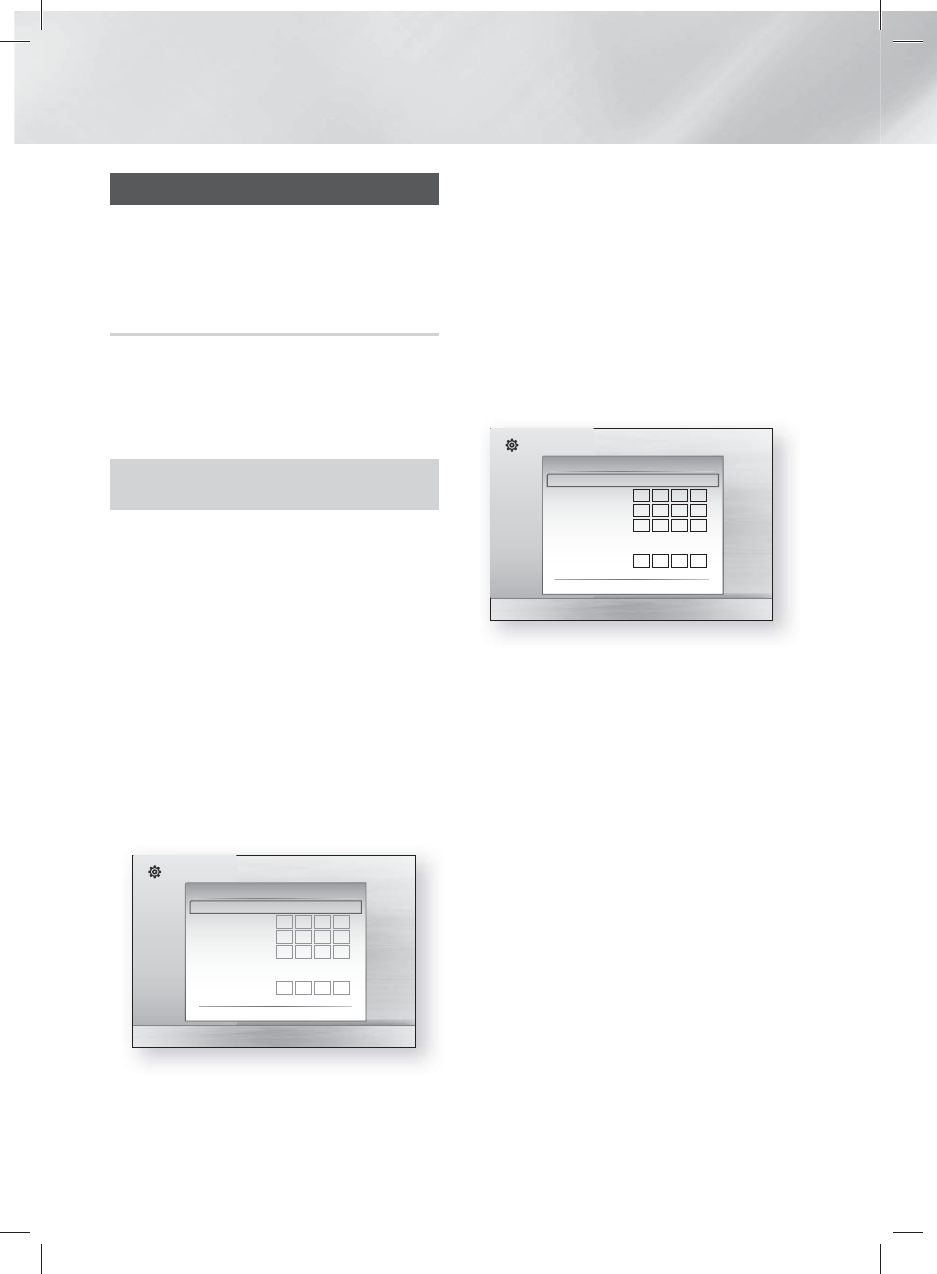
Wired Network Settings
Internet Protocol Setup : Auto
\
IP Address :
0
0
0
0
Subnet Mask :
0
0
0
0
Gateway :
0
0
0
0
DNS : Auto
DNS Server :
0
0
0
0
>
Move
"
Select
'
Return
5 . The Network function acquires and fills in the
values for IP Address, Subnet Mask, etc.,
automatically.
6 . After the Network function has acquired
the network values, press the RETURN (
'
)
button.
7 . Select Network Test, and then press
E
.
The home cinema validates the network
connection. When it is done, press the
RETURN (
'
) button.
❑
Manual
If you have a static IP address or the Automatic
procedure does not work, you’ll need to set the
Network Settings values manually.
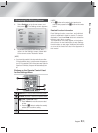
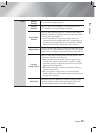
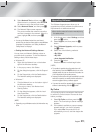
Settings
Display
Audio
Network
System
Language
Security
General
Support
Wired Network Settings
Internet Protocol Setup : Manual
\
IP Address :
0
0
0
0
Subnet Mask :
255
255
255
0
Gateway :
0
0
0
0
DNS : Manual
DNS Server :
0
0
0
0
>
Move
"
Select
'
Return
1 . Follow the first four steps in the Automatic
procedure, but select Manual instead of Auto
in Step 4.
2 . Press the
▼
button to go to the first entry
field (IP Address).
3 . Use the number buttons on your remote to
enter numbers.
4 . When done with each field, use the ► button
to move successively to the next field.
You can also use the other arrow buttons to
move up, down, and back.
5 . Enter the IP Address, Subnet Mask, and
Gateway values.
6 . Press the ▼ button to go to DNS.
7 . Press the ▼ button to go to the first DNS
entry field. Enter the numbers as above.
8 . Press the RETURN (
'
) button on your
remote.