


8
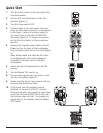
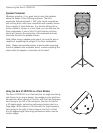
1. Turn the Level control on the rear panel fully
counterclockwise.
2. Set the HPF and EQ switches to the Flat
positions (figure 1).
3. Turn the Power switch OFF.
4. Connect either a line level signal from your
mixer (or other audio source) or a microphone
to the Input 1 jack or a line level signal to
the Input 2 jack on the Auro X12D/X15D
rear panel (figure 2). If using a microphone,
set the Mic/Line Switch to the microphone
position.
5. Connect the supplied power cable to the AC
Power Inlet on the back of the loudspeaker.
Plug the power cable into an AC outlet (figure
4).
Note: Always make sure that the AC outlet
is configured with the correct voltage as
indicated on the rear panel of the Auro
loudspeaker.
6. Switch the Auro’s Power switch to the ON
position.
7. Turn the Master VOL control up.
8. Run an audio signal from your mixer, or talk
into the microphone (figure 4).
9. Slowly raise the Auro’s Level control until you
have reached the desired level.
10. If the sound from the speakers sounds
distorted, or you see the FAULT indicator
blinking frequently, turn down the Input Level
control on the Auro X12D/X15D a little until
the indicator does not light. To increase the
output level of the cabinet, raise the Master
VOL Control.
Quick Start
figure 1
figure 2
figure 3
figure 4