


• Make sure that the entire path between speakers and amplifier is clear and not obstructed by a floor or ceiling joist
or masonry wall which you won’t be able to drill through.
• Remember that the other end of the wires has to come out somewhere to connect with the amplifier. Confirm
ahead of time that you can drill an outlet hole easily and in an un-obtrusive spot.
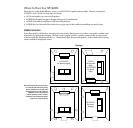
PAINTING THE SPEAKERS
If you like the designer white finish which has been applied to your Russound In-Wall Speakers, skip to the section
“cutting holes”. But if you want your speakers to completely blend in with a colored wall or accent the surface, now
is the time to paint your Russound speakers’ outer frames and perforated grilles.
The speaker’s outer surfaces are primed to accept ordinary latex wall paint or aerosol spray paint. Because the surface
behind the perforated grille should remain black, you will need to mask this area off before you begin painting or use
the included template cover.
1. Remove the speaker grilles. From the back of the speaker, push the clamp (dog-ear) towards the grill to loosen it
so you can pull it off.
2. Attach masking tape to the cardboard masking template which has been included with your speakers.
3. Press the template onto each speaker’s surface to cover the woofer and tweeter.
4. Paint the outer speaker frame and grille separately. A roller with a short or medium nap will work much better than
a brush. If you’re using spray paint, make sure that you achieve the same coverage on both grille and frame.
5. After the paint has thoroughly dried, remove the template and/or masking tape.
There’s no need to replace the grill at this time since you will need access to the inner speaker surface during
installation.
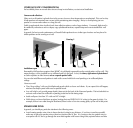
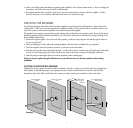
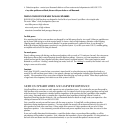
CUTTING HOLES FOR THE SPEAKERS
Wallboard is an easy surface in which to make a relatively neat hole. Make sure you don’t make it any bigger than
the template. In the following steps, you’re going to locate a section of wall between two studs, mark the outer
boundaries of the hole, drill a small hole in the center to confirm your location and then cut the main hole.
5
A. Trace template
outline
B. Drill 1-inch pilot
hole
C. Probe with
wire for stud
clearance
D. Cut speaker hole
along outline
Drawing 3