1. Product Overview
The Smart Select™ Volume Control (SSVC) is the next evolution in Volume Control systems. The SSVC integrates
Russound’s well-known Ultra-Match™ impedance-matching volume control technology with multi-zone func-
tionality and automation. Smart Select™ offers many outstanding features such as “All On” and “All Off” whole-
system commands, one-button function control interface and an easy to read, three color status indicator light.
Russound Ultra-Match™ Volume Controls eliminate the need for an impedance-matching speaker selector. With
a few simple calculations and jumper settings, your SSVC system can be configured to connect up to 16 pairs of
speakers to a single amplifier.
2. What You Will Need
• Russound SSVC(s) (1 included)
• Russound EZB-1 Connecting Blocks (2 per system)
• Russound EZB-2 Add-On Connecting Blocks (2 when connect-
ing 5-8 volume controls, 4 when connecting 9-12 volume con-
trols) (limit 12 volume controls per system)
• Russound Smart Select™ Power Interrupter (1 per system)
• Russound 846XP 12v, 1A, DC power supply (1 per system)
• Amplifier or stereo receiver
• Stereo speaker pair(s) (1 per volume control)
• 18-12 AWG speaker cable constructed for in-wall use
• 22 AWG, 4 conductor (2 twisted pair) data cable with overall
shield and drain
• Wire cutters, wire strippers, small flat head screwdriver
NOTE: When using the optional Smart AC™ Power Controller, it is not necessary to install the Smart Select™
Power Interrupter or the #846XP Power Supply.
3. Connection Instructions
IMPORTANT - If you are unsure of any of the installation procedures, the products should be installed by a pro-
fessional custom installer.
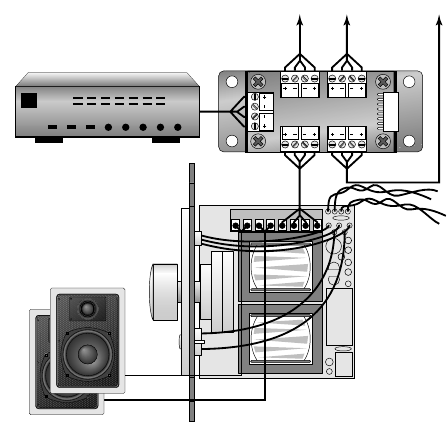
3.1 Amplifier / Speaker Connections (Refer to Figure 1)
1) Make sure that the amplifier or receiver that will be connected is turned Off.
2) Use only 18-12 AWG speaker cable constructed for in-wall use (refer to the Russound product catalog for rec-
ommended speaker cables).
3) Strip 1/8” of insulation from the ends of all the speaker wires that will be connected to the volume control. If
necessary, twist or solder the ends to keep from fraying and shorting with other wires.
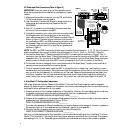
4) Connect the leads from the amplifier’s speaker outputs to the connector labeled “INPUT” on the EZB-1
Connecting Block as shown in Figure 1. The wires must stay consistent, left + of the amplifier’s output to left +
input of the connecting block, observing polarity and channel.
NOTE: If more than 4 volume controls are to be connected, use Russound Part No. EZB-2 Add-On Connecting
Blocks to allow for as many as 12 connected volume controls.
5) Connect the leads from the connecting block outputs labeled “SPEAKERS” to the connector labeled “INPUT”
on the volume control. The wires must stay consistent, left + of the connecting block output to left + input of
the volume control.
6) Connect the wires from the speakers to the connector labeled “OUTPUT” on the volume control as shown in
Figure 1.
CAUTION: Do not reverse the input and output connections!
R–R–L–L+R+R–L–L+
OUTPUT INPUT
SPEAKERS SPEAKERS
SPEAKERS
INPUT
SPEAKERS
AMP/Receiver
Speaker Pair
To power
and data
connections
(figure 2)
Smart Select
™
Volume Control
EZB-1, 4-Way
Connecting
Block
Figure 1
To other Smart Select
™
Volume Controls
2


