7
Speaker Outputs
Speaker Selector Switch
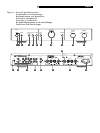
[See Figure 2.]
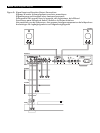
The RA-01 has two sets of speaker outputs,
labeled “A”
and “B” . The speaker out-
puts are controlled by the switch
on the
front panel.
Speaker Selection
If only one set of speakers will be used at any
given time, the speakers may have an imped-
ance as low as 4 ohms. If there are times when
both the A and B speakers will be used, all
the speakers should have an impedance of 8
ohms or more. Speaker impedance ratings are
less than precise. In practice, very few loud-
speakers will present any problems for the
RA-01. See your authorized Rotel dealer if you
have any questions.
Speaker Wire Selection
Use insulated two-conductor stranded wire to
connect the RA-01 to the speakers. The size
and quality of the wire can have an audible
effect on the performance of the system. Stan-
dard speaker wire will work, but can result
in lower output or diminished bass response,
particularly over longer distances. In general,
heavier wire will improve the sound. For best
performance, you may want to consider special
high-quality speaker cables. Your authorized
Rotel dealer can help in the selection of cables
for your system.
Polarity and Phasing
The polarity – the positive/negative orienta-
tion of the connections – for every speaker and
amplifier connection must be consistent so all
the speakers will be in phase. If the polarity
of one connection is reversed, bass output will
be very weak and stereo imaging degraded.
All wire is marked so you can identify the two
conductors. There may be ribs or a stripe on
the insulation of one conductor. The wire may
have clear insulation with different color con-
ductors (copper and silver). There may be po-
larity indications printed on the insulation. Iden-
tify the positive and negative conductors and
be consistent with every speaker and ampli-
fier connection.
Speaker Connection
Turn off all the components in the system be-
fore connecting the speakers. The RA-01 has
color-coded binding post type speaker connec-
tors on the back panel (except in European Com-
munity countries where their use is not permit-
ted). These connectors accept bare wire, con-
nector lugs, or dual banana type connectors.
Route the wire from the RA-01 to the speak-
ers. Give yourself enough slack so you can
move the components to allow access to the
speaker connectors. If you are using dual
banana plugs, connect them to the wires and
then plug into the backs of the binding posts.
The thumbscrews of the binding posts should
be screwed in all the way (clockwise).
If you are using terminal lugs, connect them
to the wires. If you are attaching bare wires
directly to the binding posts, separate the wire
conductors and strip the insulation from the
end of each conductor. Be careful not to cut
into the wire strands. Unscrew (turn counter-
clockwise) the binding post thumbscrews. Place
the connector lug or wire around the binding
post shaft. Turn the thumbscrews clockwise to
clamp the connector lug or wire firmly in place.
NOTE: Be sure there are no loose wire
strands that could touch adjacent wires or
connectors.
Phones Output
The Phones output allows you to connect head-
phones for private listening. This output ac-
commodates standard stereo phone (1/4”)
plugs. If your headphones have another type
of plug, such as a 1/8” mini-plug, you will
need an adapter plug. Contact your autho-
rized Rotel dealer, to get the correct adapter
plug. Plugging in a set of headphones does
not cut off the signal to the outputs. Use the
Speaker Selector to turn off the speakers. The
settings of the Function Selector and the Tape
Monitor Control determines which source is
heard. To listen to or monitor the component
connected to the Tape input set the Monitor
Control to the Tape position. For all other in-
puts leave the Monitor Control in the Source
position and select the source you want to listen
to with the front panel Function Selector.
NOTE: Because the sensitivity of speakers
and headphones can vary widely, always
reduce the volume level before connecting
or disconnecting headphones.
Audio Controls
Volume Control
Turn the controls clockwise to increase the vol-
ume, or counterclockwise to decrease the vol-
ume.
Balance Control
The Balance Control adjusts the left-to-right
balance of the sound output. Normally the
control should be left in the center position.
In some situations, typically when the main
listening position is not ideally centered be-
tween the speakers, it may be necessary to
adjust the control to achieve proper left-to-right
balance. Turning the control counter-clockwise
shifts the sound balance to the left. Turning the
control clockwise shifts the sound balance to
the right.
Tone On/Off Switch
When the Tone Switch is in the Off position
the Bass and Treble Control (Tone Control)
circuits are bypassed to ensure the purest pos-
sible sound. Leave the Tone Switch in the Off
position unless you want to use the Tone Con-
trols. Turn the Tone Switch to the On position
if you want to adjust the Tone Controls.
Bass and Treble Controls
When the Tone Switch is in the On position,
turning the Bass and Treble Controls adjusts
the tone balance of the sound. Turn the Con-
trols clockwise to increase the bass or treble
output. Turn the Controls counterclockwise to
decrease the bass or treble output.
A properly set up high-performance audio
system produces the most natural sound with
little or no adjustment of the tone controls. Use
these controls sparingly. Be particularly careful
when turning the controls up (clockwise). This
increases the power output in the bass or treble
range, increasing the load on the amplifier
and speakers.
English


