


6
OPERATION OF THE PREAMPLIFIER
Powering up the System:
After all proper connections have been made, you are now ready to turn the Hera
preamplifier on. The power on/off switch is on the front of the power supply. The
Hera employs an automated sequential soft-starting mode to prolong tube life as
well as to suppress turn-on transients. When the unit is first turned on, the tube
heaters are energized. After approximately twenty seconds, the high voltage
supply is turned on and after and additional twenty seconds the outputs are
disconnected from ground and the preamp is ready for operation. After turning on
the preamplifier, turn on the power amplifier and source material and you are
ready for listening. Note that critical portions of the Hera remain energized even
with the power button in the off position. The first time that the Hera is turned on
(and anytime it is unplugged from the power outlet) it is best to let it idle for a few
minutes before playing music. This allows these portions of the circuitry to reach
optimum operating parameters.
NOTE - This unit will not play for approximately 40-60 seconds after
power on while the preamp goes through its sequential start-up.
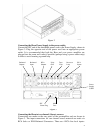
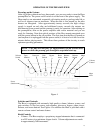
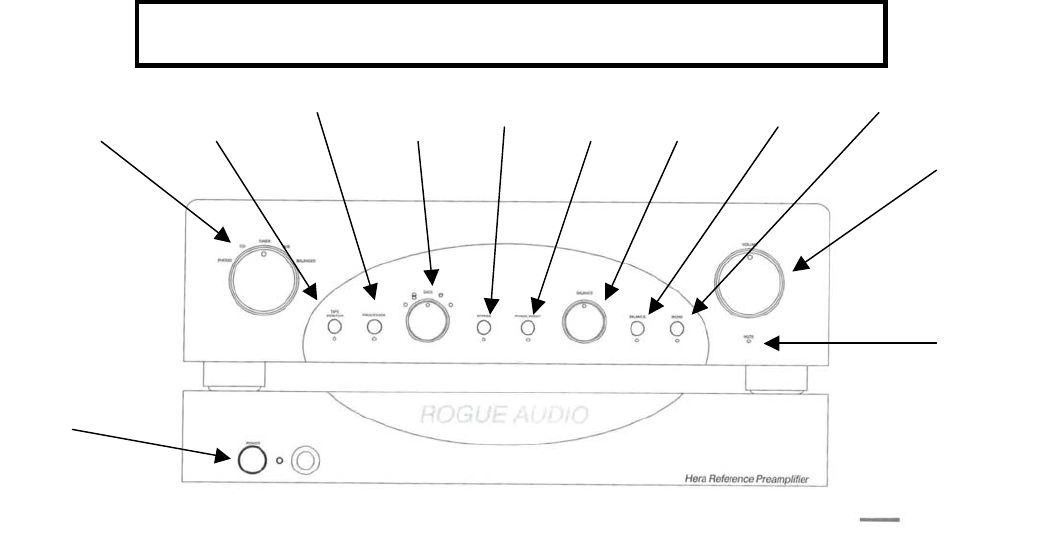
Figure 4
Switches and Controls:
The Hera is equipped with extremely high quality volume, balance, source, and
gain switches. It also has power, tape monitor, processor, bypass, phase invert,
balance, and mono buttons. See Figure 4. In addition the Hera is provided with a
remote volume control and mute feature.
Knob Controls
• Volume - The Hera employs a proprietary stepped attenuator that is connected
to a DC motor via a miniature slipper clutch. Volume adjustments are made
in approximately 2dB increments.
Selector
Switch
Tape
Monitor
Processor Gain
Switch
Bypass Phase
Invert
Balance
Knob
Balance
Switch
Mono
Volume
Control
Mute
LED
Power
Switch