


IMPORTANT NOTICE REGARDING BASS MANAGEMENT: It is important the signal being sent
to the amplifier be a non-boosted or “flat” signal. To be sure of this, check the settings
on your receiver or processor to make sure any “bass boost”, “super bass” or “loudness” is
set to Off. In most cases for home theater, setting a receiver or processor will determine
the crossover frequency through bass management settings. In this configuration, connect
the receiver or processor to the LFE Line Level Input. Your amplifier can now reproduce
the bass frequencies the way they were originally recorded. Use the amplifier level control
and the individual bass management control within the receiver or processor to adjust
the amplifiers’ volume if necessary. Once set, the volume controls should not need to be
altered as the amplifier’s volume will coincide with the master volume control of your
receiver or processor.
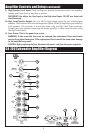
2. Volume/Level Control: The volume/level control should be at the minimum setting (all the way
counter-clockwise) before plugging the amplifier into an AC wall socket. Once plugged in, turn the
level control up one quarter of a turn (9 o’clock position) for an initial setting. The level control
may be adjusted while playing to match the level with the rest of the system.
IMPORTANT! The volume control should be at the minimum setting (all the way counter-
clockwise) before plugging the amplifier into an AC wall socket.
3. Crossover Frequency Control: The variable crossover frequency control allows you to set the
low-pass crossover point of the amplifier anywhere from 40-180 Hz. Experiment with setting the
crossover frequency control at highest setting initially. Increasing the crossover frequency will
allow more mid-bass output decreasing the frequency will allow only deeper bass.
NOTE: Read the Important Notice above regarding bass management.
4. Auto Signal Tracking: The amplifier uses “smart” signal tracking circuitry. Once the power cord
is plugged in and the switch set to auto, the amplifier automatically turns on when a signal is
detected at the preamplifier or high level inputs and turns off when no signal has been detected
for 15 minutes.
5. Phase Control: This control changes the phase of the amplifier. Changing the phase will change
the way the subwoofer and main speakers interact with each other at the crossover frequency.
Varying the phase position may result in more or less mid bass depending on the phasing between
the main speakers and the subwoofer. Generally, the phase is left at the 0° position.
6. Low-pass Switch: This switch allows the amplifier’s internal crossover to be defeated when using an
external crossover, or when the crossover is not needed. This switch should be in the “on” position
when the audio signal sent to the amplifier is not from a previously crossed-over source. The switch
should be set to “off” when the audio signal sent to the amplifier is coming from a source already
using a crossover, such as the subwoofer pre-out from a receiver or pre-amplifier. This will ensure
the amplifier is not receiving an audio signal which is double-filtered.
NOTE: Read the Important Notice above regarding bass management.
7. Line Output: These RCA terminals are for “daisy chaining” to another subwoofer or amplifier.
A full-range signal is sent through these terminals.
8. LFE Line Level Input: Typically this will be the line level input used to connect to most
receivers or processors. The LFE input will bypass the amplifier’s crossover control. This input
should be used when the input signal is coming from a receiver or processor where the bass
management is controlled by the receiver or processor.
NOTE: Read the Important Notice above regarding bass management.
2
Amplier Controls and Setup (continued)