


Talk over the project with the customer. Find out when you will have access to the building. Before you start be sure you
have a complete understanding with the customer:
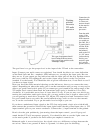
Where the transmitter will go
Where the transmitter could go if the first choice will not work
Where the studio is to go
Other places the studio could go.
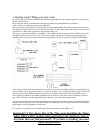
How the wire will be run
There is a possibility of installing without a wire, but this will not be talked about in this manual
While you are helping to pick these locations you need to look at how hard it will be to connect the wire between the
transmitter and studio. Keep in mind that when you leave you want to have the wire neatly placed and attached.
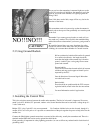
2. Starting the Installation
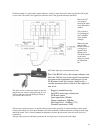
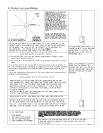
2.1 Picking the Grounding for the transmitter
Picking the ground to use can be the most important part of the job. The ground that you use will determine the range you
get. You may be able to get by using the ground rod that is already installed at the electrical meter/ phone pole/ or exist-
ing metal waterpipe or sewer connection, or you may need to add/install your own ground. You often need to pick the
transmitter location based on the ground you are going to use.
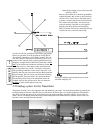
The AM ground in an AM system is critical, not only for system performance, but also often for lightning protection. The
goal is to provide a low resistance connection to the local Earth, less then 25 ohms if possible, less then 5 ohms is ideal.
The ground resistance in an area will be determined by your ground system and:
• Moisture content of soil
• Mineral content of soil
• Soil type
Soil contaminants
In general the higher the moisture content, the lower the resistivity will be.
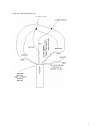
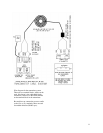
What you are trying to do is make an electrical connection to the earth over a broad area. What that means is if you have
multiple rods keep them at least 6 feet apart, don’t concentrate on just a small area of dirt. For example don’t place 10
rods in a 2 foot circle. The more yard area you can cover with your system the better. A 20 foot diameter circle would
keep the rods about 6 feet apart. Keeping the system spread out allows the currents to flow more efficiently.
Working with different installation sites you have to be creative in making a good ground. You may find existing struc-
tures and/or items that can help you connect to the Earth. A buried tank, deep well casing, metal fence, Metal tube lawn
sprinkler system, all can be useful.
• Sand and gravel, even when wet can make a poor ground.
• Use corrosion resistant connectors when possible
• Solder (electrical type solder) all connections or be sure all connections are bright and shiny & then tightly clamped.
• You can use an Earth resistance meter to check the resistivity value of your system. Also see the troubleshooting
manual.
• If you are connecting to a utility water pipe, connect to it within 5 feet of where it comes in from the dirt. This keeps
someone else from coming in later and putting in non-conductive pipe, making your ground useless.
• Sodium bentonite can be used to enhance a ground.
• If you are using ground radials, they should be as long as your antenna is high to be effective.
Try to use the moistest dirt possible. For example if there is an air conditioning system, install a rod where the condensate
drips. Look to see where the rain comes off the roof to find moist areas. Look for any creeks or ponds. Running a long
wire to a creek or pond far away may not be effective, the ground system needs to be in the area of the antenna. Or you
can possibly install the transmitter in the area of any great natural ground.
Be sure all your connections are good. The wire should be bright and shiny (use steel wool if you need to) and then
tightly clamped and/or soldered with torch and electrical solder and then weatherproofed with silicon
4