


FR146 • 10
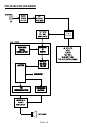
RAMSEY “Learn-As-You-Build” KIT ASSEMBLY:
We have a twofold "strategy" for the order of the following kit assembly steps.
First, we install parts in physical relationship to each other, so there's minimal
chance of inserting wires into wrong holes. Second, whenever possible, we
install in an order that fits our "Learn-As-You Build" Kit building philosophy.
FOR EACH PART, OUR WORD "INSTALL" ALWAYS MEANS THESE STEPS:
1. Pick the CORRECT part value to start with.
2. Insert it into the CORRECT PC board location.
3. ORIENT it correctly, which means: PLEASE follow the PC board drawing
and the written directions for ALL parts where there's a right way AND a wrong
way to solder it in. (Diode bands, electrolytic capacitor polarity, transistor
shapes, dotted or notched ends of IC's, and so forth.)
4. Solder ALL connections unless directed otherwise. Use enough heat and
solder flow for clean, shiny, completed connections. Don't be afraid of ANY
pencil style soldering iron having enough heat to damage a component.
5. Trim or "nip" excess wire lengths after soldering.
NOTE: Save some of the longer wire scraps nipped from resistors and
capacitors. These will be used to form wire jumpers (JMP1, etc.) to be soldered
in just like parts during these construction steps.
Now, let's start building!
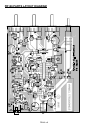
❒ 1. Press S1 firmly into its six holes and solder all six pins. The switch fits
the board only one way.
❒ 2. Install J1, the RCA-style antenna jack. Solder all 4 points.
❒ 3. Install J2, the subminiature phone jack. Solder all three points. Be
gentle and patient in inserting, so as not to damage the solder tabs.
❒ 4. Install controls R1, R2 and R3. Insert the three PC mounted controls
into their positions. Check that the controls are pressed in firmly and
straight against the top of the board. Solder the three center pins and then
the two larger mechanical mounting tabs. Use enough solder for a solid
connection.
Also, if you plan to use an enclosure other than the custom Ramsey enclosure
and knob kit, you may wish to locate the controls differently than provided by
the PC board. In this case, the control lugs are wired to the PC board using
your own insulated hookup wire, kept as short as possible for neat installation.