


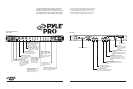
1.Input Connections
The PDSP850 accepts a board range of input sources, including:
Compact Disc (CD) player
Camecorder or VCR
Cassette, Reel to Reel or other tape recorder or player
Radio Tuner
Turntable
These can be connected via RCA type jacks to the input jacks
on the rear panel of PDSP850.
INSTALLATION GUIDELINES
2 – PYLE PRO PDSP850 Owner’s Manual PDSP850 Owner’s Manual -3
Connecting a High Level Output Audio Sources
Connect up to 2 such sources (tuner, cassette deck, cd player,
camcorder or V CR) to the input jacks for LINE 1 (if not being used
as PHONO input) and LINE 2.
Please note that PHONO and LINE 1 use the same jacks, The jacks
should be set to LINE 1 if the jacks are used for the High Level
input sources described here.
CD Player
or VCR
Tuner
Connecting a Phono Turntable
Connect a turntable to the PHONO/LINE 1 input jacks.
Please set the LINE 1/PHONO selection switch to PHONO.
Turntable
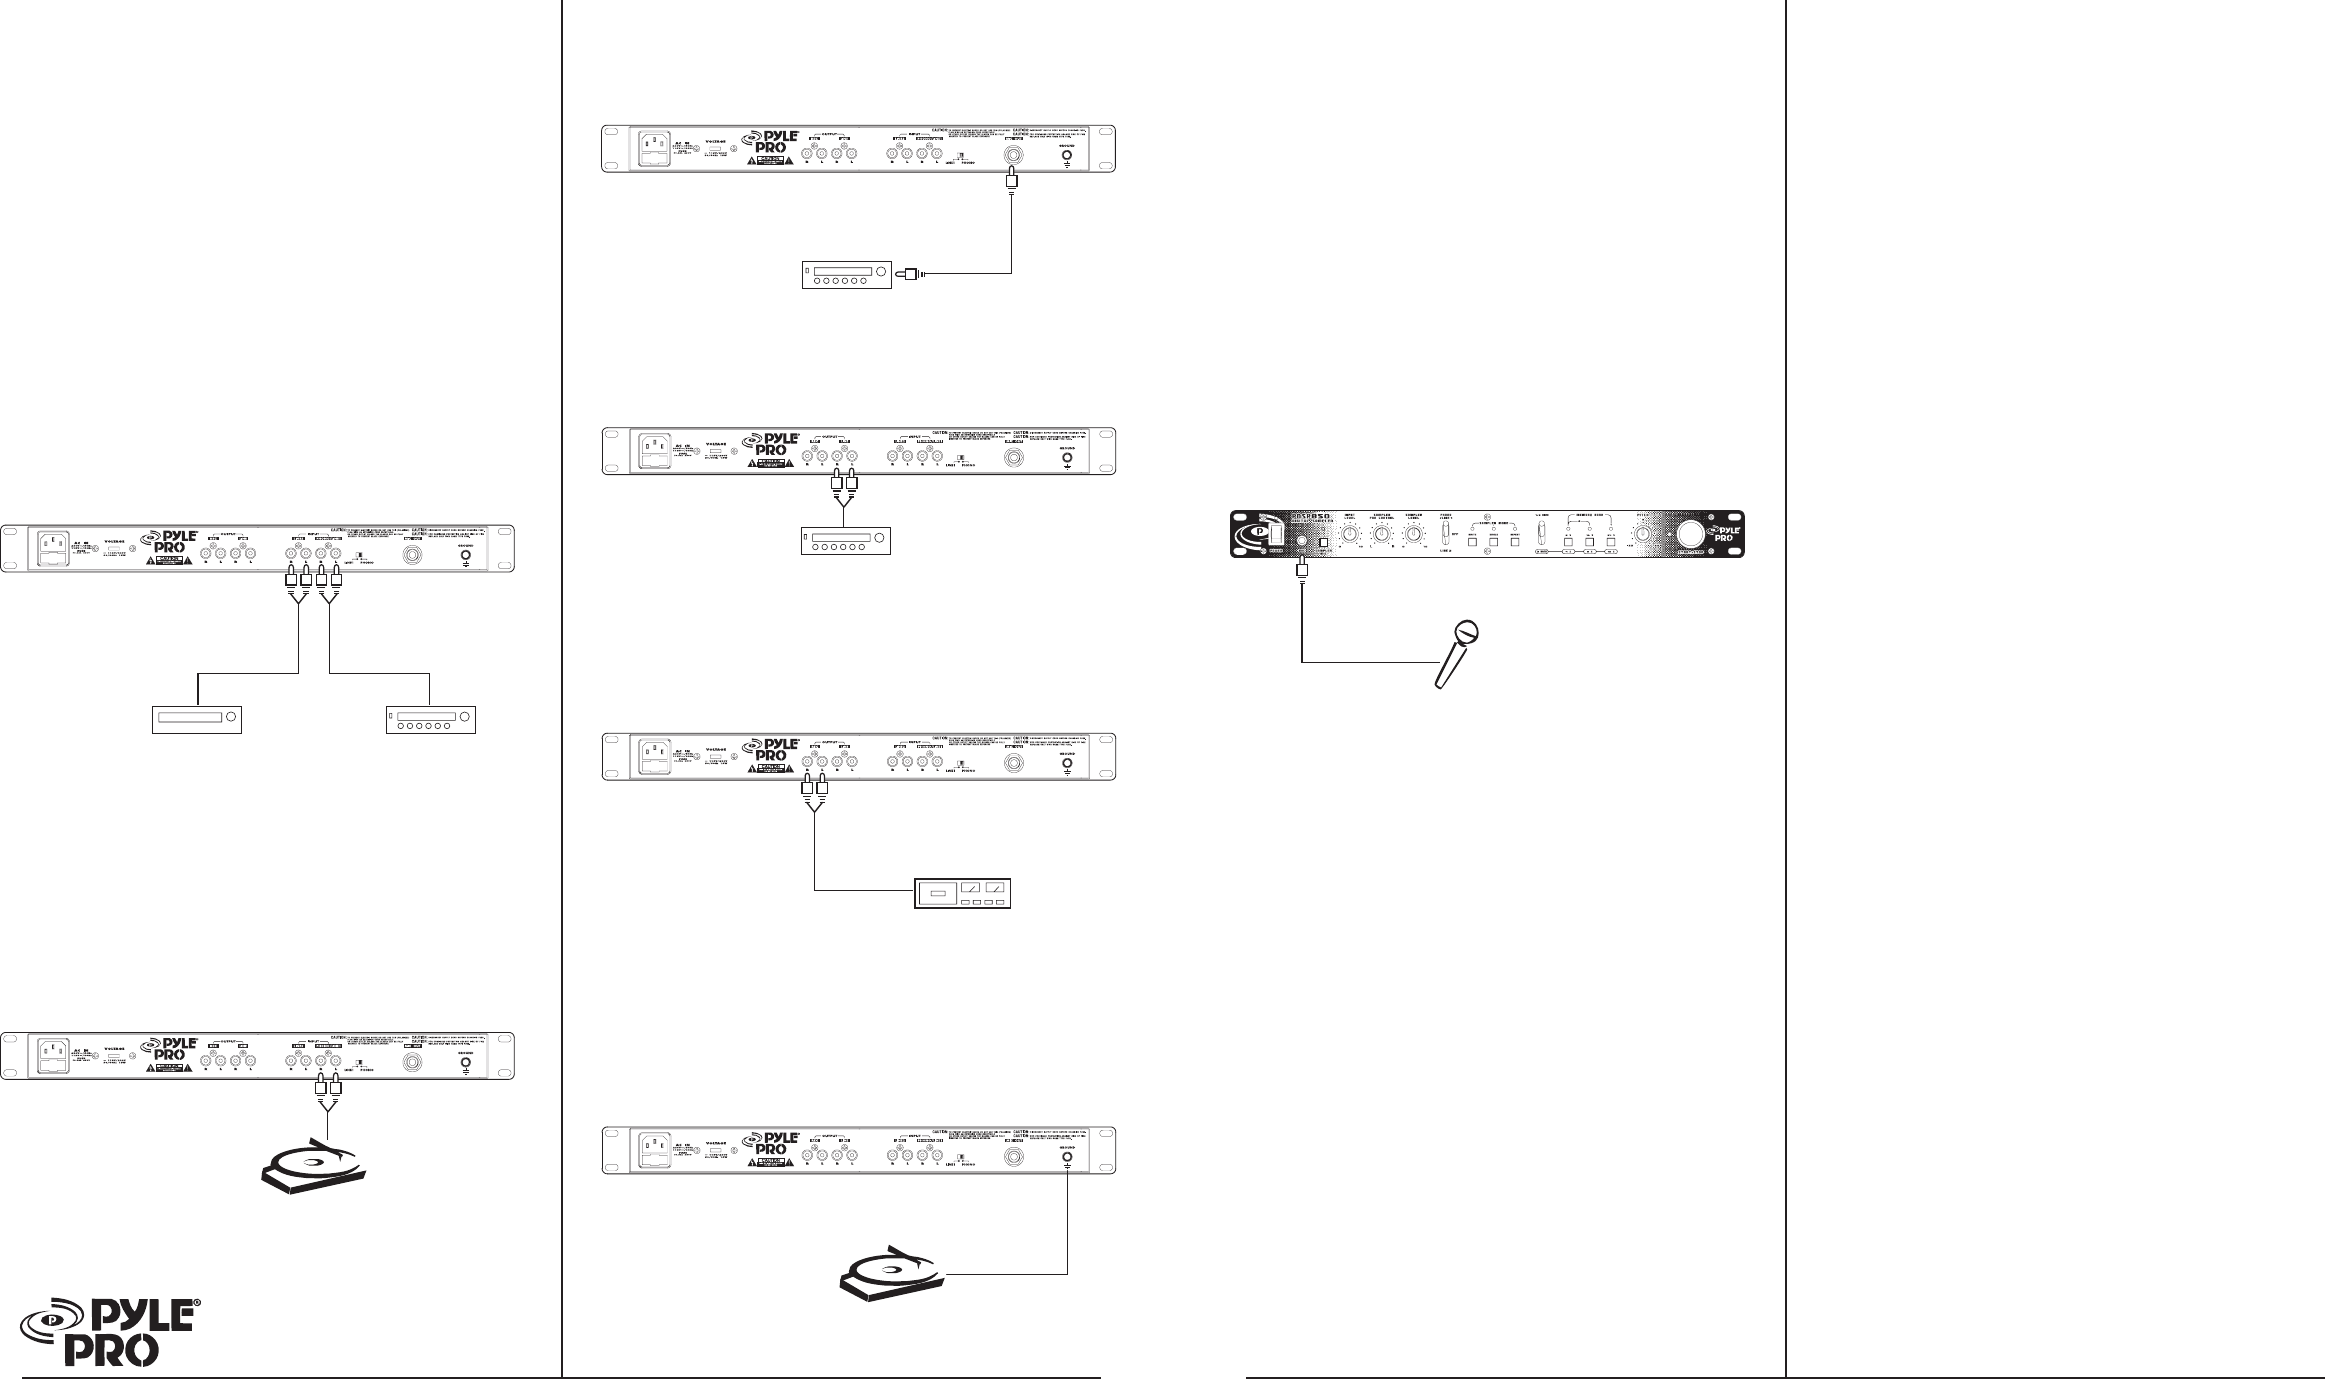
2.Output Connections
Connecting The MIC OUTPUT
Connect the MIC INPUT of your mixer or amplifier to MIC OUT
jacks.
Connecting The LINE OUTPUT
The PDSP850 has been designed to provide output to a power
amplifier or sound processor (mixer).
Amplifier or
Signal Processor
Connecting The REC OUTPUT
The PDSP850 has been designed to serve as an audio source for
tape recording.
Tape Deck
3.Grounding the preamplifier
Grounding your turntable to an earth ground is a good idea in
order to reduce or eliminate hum or static that the phono system
may introduce to the audio signal path. Securely fasten a wire
from the ground screw on the rear panel to the ground lead from
your turntable.
Turntable
Ground
Wire
Microphone
4.Strandard AC Power Conneciton
After making all other connections, set the POWER switch to OFF
position. Then connect the power cord to a standard AC outlet.
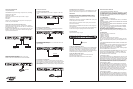
OPERATIONS
1.Selecting the Input Source, PHONO/LINE 1, OFF, & LINE 2
Select the input signal goes through the PDSP850 by setting
the PHONO/LINE 1, OFF, & LINE 2 selector on the front panel
to the postion selected.
PHONO/LINE 1:The source connected to PHONO/LINE 1 input jacks
on the back panel will be selected.
LINE 2:The source connected to LINE 2 input jacks on the back
panel will be selected.
OFF:No signals from PHONO/LINE 1 & LINE 2 will be through the
unit to the mixer.
It is good to use when you are playing back the recorded sample,
to eliminate the signal inputing from the selected sources.
2.Connecting MIC
Input connection using 1/4" jack
3.Using the SAMPLER MIC switch
To make the sample from the microphone, push the SAMPLER MIC
button (the LED indicator will be illuminated). The microphone
signal going to the sampler. The selected source will still play
through the unit but it can not be sampled. The microphone output
is controlled by the microphone section of your mixer.
4.Using the INPUT LEVEL control
Adjusting the gain of input source to fine tune the level,
since input levels usually vary.
Rotate the INPUT LEVEL clockwise to increase levels.
USING THE DIGITAL SAMPLING
1.The BANK MODE and MEMORY TIME BANK
The PDSP850 equipped with two options of BANK MODE, 1/2-BANK
& 3-BANK, and each mode has 3-MEMORY TIME BANK of choice.
In 1/2-BANK mode, you can choose either 1 BANK or 2 BANKS for
recording, and in 3-BANK mode you can store the samples to all
of 3 BANKS individually.
A.1/2-BANK MODE
The recording time in this mode are:
1 BANK for 24 seconds (1-BANK MODE USE ONLY, IF THIS BANK IS
STORED)
1 BANK for 8 seconds (LINKING WITH THE 2ND BANK OF 16 SECONDS
FOR 2-BANK MODE USE)
1 BANK for 16 seconds (LINKING WITH THE 2ND BANK OF 8 SECONDS
FOR 2-BANK MODE USE)
The 24 seconds bank is the longest recording time in PDSP850,
you can not use the other banks to store the different samples
in this mode, if this bank is stored.
The 8 and 16 banks are separate and can be linked,
you can store a different sample in these two banks, but they
must be recorded individually and they must be played one at a
time.
B.3-BANK MODE
The recording time in this mode are:
1 BANK for 4 seconds
1 BANK for 8 seconds
1 BANK for 12 seconds
These banks are separate and can be linked,
you can store a different sample in these three banks, but they
must be recorded individually and they must be played one at a
time.
2.The SAMPLER MODE(WRITE/SINGLE/REPEAT) and START/STOP
(RECORDING)
A.Select the source you want to sample by placing the input source
selector (PHONO/LINE 1 & LINE 2) or the SAMPLER MIC button
(see "Using the SAMPLER MIC switch" in OPERATION).
NOTE:The SAMPLER MIC must be in OFF mode, if making sample
from the PHONO/LINE or LINE 2 source.
B.Select the BANK MODE and MEMORY BANK you want to record
by placing the bank mode selector (1/2 BANK & 3 BANK) and
pressing the proper MEMORY BANK (4, 8, 12, 16, or 24) button
(the LED indicator will be illuminated).
C.TO RECORD - WRITE
Set the SAMPLER MODE switch to WRITE position (the LED will be
illuminated) and press the START/STOP button (the LED will be
RED illuminated) to begin the recording. Pressing the START/STOP
button again, to stop the recording (the LED will be turned off).
If you do not press stop, it will automatically stop after the
selected MEMORY BANK TIME (4, 8, 12, 16, or 24 seconds) is up.
D.TO PLAYBACK - SINGLE
Set the SAMPLER MODE switch to SINGLE position (the LED will
be illuminated) and press the START/STOP button (the LED will
be GREEN illuminated) to playback the sampler one time. Every
time you press the START/STOP button, the unit will replay the
recorded sample from the beginning and play it through the
end of recorded sound. Rapid, consecutive pressing of the
START/STOP button will create an interesting stuttering effect.
E.TO PLAYBACK - REPEAT
Set the SAMPLER MODE switch to REPEAT position (the LED will
be illuminated) and press the START/STOP button (the LED will
be GREEN illuminated) to playback the sampler all the way through,
and then repeat it until you press the START/STOP button to stop.