


For accessories and information visit www.polkaudio.com 3
CONNECTING THE SPEAKERS TO YOUR SYSTEM
Follow the hookup directions included with your receiver. We recommend using two-conductor 16 gauge or thicker speaker wire. Strip 1/4"
(6mm) of insulation from each of the two conductors to expose the bare metal and twist each of the individual conductors into single unfrayed
strands. Note that one of the terminals on the rear of each speaker is red (+) and the other is black (–). Make certain that you connect the wire
from the red (+) terminal of your amplifier or receiver to the red (+) terminal on your speaker and the wire from the black (–) terminal of your
amplifier or receiver to the black (–) terminal on your speaker. Most wire has some indicator (such as color-coding, ribbing or writing) on one
of the two conductors to help you maintain consistency. If your speakers sound “thin,” with little bass and little or no center image, chances are
that one of the speaker wires is connected backwards. Double-check all connections.
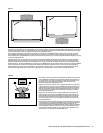
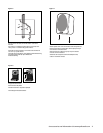
USING PUSH-TAB CONNECTORS (FIGURE 8)
To connect wire to the push-tab connectors, push the plastic tab of one connector to open the hole. Insert the bare wire into the hole and
release the plastic tab (Figure 8). Repeat this step with the other connectors.
A NOTE ABOUT BASS MANAGEMENT
For best sound, DO NOT USE THE “SUBWOOFER OUTPUT” OR LFE JACK ON YOUR RECEIVER TO CONNECT THE SUBWOOFER. The RM6000
System features a powered subwoofer that has a built-in, adjustable low pass filter to separate the low frequency signals (the bass) from the
full range signal. The dedicated “subwoofer output” jacks (sometimes labeled “LFE” or “Low Frequency Effects”) on most receivers also contain
a fixed low pass filter. If you connect the subwoofer to the receiver’s LFE Out jack, the two filters will interact, reducing the fidelity of your
system. Follow the hook up and receiver set-up/bass management instructions below and all of the bass will go to the subwoofer, you will not
lose any bass, and you will get the highest possible performance from your system. We promise.
For more detailed subwoofer placement and set-up advice go to http://www.polkaudio.com/home/faqad/.
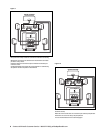
RECOMMENDED HOOK-UP METHOD (FIGURES 9, 10)
Connect the left and right front speaker outputs of your receiver or amplifier to the speaker level inputs of the powered subwoofer with
speaker wire.
Then, connect the left and right front satellite speakers with speaker wire from the speaker level outputs from the powered subwoofer.
If it is more convenient, parallel wire the subwoofer and front satellites from your receiver (Figure 10).
Connect the Center Channel Speaker directly to the center channel output from your receiver.
Connect the Rear Surround Satellites directly to the rear or surround channel outputs from your receiver.
RECEIVER SET-UP/BASS MANAGEMENT
All surround receivers allow you to “customize” their performance depending on the size of your speakers. Refer to the owner’s manual of your
receiver or surround processor to learn how this is done. To get the best performance from the RM6000, use the following settings with the
above hook-up method:
Front speakers—set to “large”
Center speaker—set to “normal” or “small”
Surround speakers—set to “small”
Subwoofer—set to “OFF” or “none.” (We know. Doesn’t make sense, right? Your RM6000 has a subwoofer. But really truly, this is the
correct setting for the recommended hook-up method. By setting the front left and right speakers to “Large” and routing them through
the subwoofer as instructed above, you deliver a full range signal to the subwoofer’s low pass filter. The low pass filter takes the low
frequencies and passes the rest on to the front speakers, for perfect sub/sat blending.)
ADJUSTING THE POWERED SUBWOOFER FOR BEST PERFORMANCE (FIGURE 11)
Set the Phase Switch to 180°.
Start with the Volume Control at about the 12:00 Noon position. Adjust up or down until you get sufficient bass for your personal taste.
Remember that sub placement position can have a very pronounced effect on the perceived bass level.
Turn the Low Pass Filter Control to the 2:00 position and adjust as appropriate for best sub/sat blending. You’ll know the setting is correct
when a high quality recorded male voice sounds full without any “chestiness.” If vocals sound “thin” turn this setting up (toward 160Hz), if
they sound “boomy,” turn it down (toward 80Hz).