


PAINTING THE SPEAKERS
The Polk AB Series Loudspeakers can be painted to fit your decorating
tastes. Paint the speaker frames before assembling them. The grilles
and frames should be painted separately. Grille – Either hang the grille
in free space or place it on paper before painting. The grilles must be
sprayed – do not use a brush or roller – Spray two or more thin
coats rather than one thick coat to avoid clogging the perforations of
your metal grilles, which can impair performance. If you are using an
interior paint, it should be thinned before spraying.
LISTENING LEVELS AND AMPLIFIER CONNECTIONS
Our AB Series Loudspeakers are highly efficient systems and will easily
achieve high listening levels with moderate amounts of power.
Remember that the greatest chance of damage to any speaker occurs
when the amplifier, regardless of size, is overdriven. Surprisingly, the
possibility is usually greater with small amplifiers than with larger ones.
If the sound becomes harsh and steely in character, then you may be
pushing your amplifier into “clipping” mode. Amplifier clipping creates
undesirable high frequency energy and runs the risk of tweeter damage.
Regardless of amplifier size or speaker power rating, when you turn the
volume control past the point where distortion becomes audible you are
risking damage to both the speaker and amplifier.
IMPORTANT—Proper polarity is essential to the Polk AB series. The
positive terminal on the driver is designated with a plus(+). It must be
connected to the positive(red) terminal on your amplifier. The other ter-
minal, designated with a minus(-) must be connected to the
negative(black) terminal of your amplifier.
Use the pigtails to connect your speaker wire to the loudspeakers. You
may use a wirenut, solder, or twist and tape to connect the two wires.
Take special care to ensure a clean, positive connection. Make sure that
the connections are insulated from touching any other metal or each
other.
WIRING CONSIDERATIONS
As with the mounting locations, the wire routing is permanent, and so
demands special attention. The following recommendations will help you
make the best decisions in selecting and installing the wire used to con-
nect the loudspeakers to the amplifier.
Wire Recommendations
Wiring inside your walls or ceiling should be done before or in conjunc-
tion with installation of your in-wall speakers. Wire meeting appropriate
building and fire codes must be used. Use at least 18 gauge wire or
heavier. Wiring is best performed by a licensed professional.
Routing the Wire
It is beyond the scope of this manual to address all possible situations,
but certain basic rules should be followed:
1.) The wiring scheme you choose is determined by the number of
units you are installing, the way you wish to distribute the sound,
the amplifier you have chosen, and degree of flexibility you wish to
provide in your system.
2.) The wire run lengths should be kept as short as possible.
If runs over fifty feet long are necessary, heavier gauge wire
is recommended.
3.) Avoid routing speaker wires near house electrical cables. If this
cannot be avoided, try to make the speaker wires cross the power
cable at right angles.
4.) Try to avoid routing the wires against sharp objects, particularly
plumbing or electrical fittings.
5.) Allow about two feet of free wire at the wall cutout to facilitate
installation of the loudspeaker.
TOOLS NEEDED
•Pencil and template for marking cutout
(template is part of packaging insert)
•Keyhole saw and/or utility knife for cutting
mounting opening
•No. 2 phillips head screwdriver
•Wire strippers
•Sharp pointed metal device, such as ball point pen,
paper clip, or metal scriber for lifting off the grille
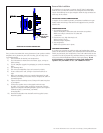
INSTALLING IN EXISTING CONSTRUCTION
Your Polk AB Loudspeakers have been designed for easy installation.
If you intend to do the installation yourself we assume that you possess
some skill in the proper use of hand and power tools. You should have
a thorough understanding of local building and fire codes and a
familiarity with the area behind the wall or ceiling where the speakers
will be installed.
If you are not accustomed to working on your walls or ceiling, the time
to get help is before you start cutting. There must be at least one inch of
clearance between the cutout and any studs or joists in order for the
mounting hardware (dogs) to place themselves properly. Wall studs are
spaced on 16 inch centers in most parts of the country, but actual spacing
should be verified.
Your AB’s require a mounting depth of at least three inches measured
from the face of the wall; they can be installed in walls faced with
paneling as little as 5/16" thick or plaster-on-lath as thick as two inch-
es. For acoustical considerations you may wish to insulate the area
behind the speaker loosely with a small amount of fiberglass batting or
dacron to reduce the potential problem of sound transmission into an
adjoining room.
For more information visit our web site at http://www.polkaudio.com