


4 Contact Polk Audio Customer Service 1-800-377-7655, polkcs@polkaudio.com
RECEIVER SET-UP / BASS MANAGEMENT
All surround receivers allow you to “customize” their performance depending on the size of your speakers. Refer to the owner's manual of your
receiver or surround processor to learn how this is done. To get the best performance from small “satellite/subwoofer” type systems, use the
following settings with the above hook-up method:
Front speakers -- set to “large”
Center speaker -- set to “normal” or “small”
Surround speakers -- set to “small”
Subwoofer -- set to “OFF” or “none.” (We know. Doesn’t make sense, right? Your system obviously has a subwoofer. But really truly, this is the
correct setting for the recommended hook-up method. By setting the front left and right speakers to “Large” and routing them through the sub-
woofer as instructed above, you deliver a full range signal to the subwoofer’s low pass filter. The low pass filter takes the low frequencies and
passes the rest on to the front speakers, for perfect sub/sat blending.)
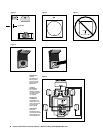
HOOK-UP METHOD #2 (FIGURE 7)
This method can be used with electronics that include a “SUB OUT” feature (Figure 7). It is not recommended for use with RM Series
“Sub/Sat” Systems.
Connect a single RCA cable from the “SUB OUT” of your electronics to the left and right. Use a “Y” cable to connect the single subwoofer output jack
to the two Line Level Inputs of the subwoofer. This input bypasses the subwoofer’s variable low pass filter and relies on the filter built into your elec-
tronics. If your “SUB OUT” is an unfiltered signal (check your owner’s manual), use either
left or right “Line Level Input,” to use the low pass crossover in the subwoofer.
When using method #2, it is necessary to adjust the settings of your electronics as follows: Front speakers = large or small depending on their
output capabiliteis; Subwoofer = “ON”.
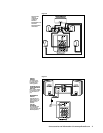
HOOK-UP METHOD #3 (FIGURE 8)
This method is for use with electronics featuring “PRE OUT” jacks. Connect the front left and right preamp outputs from your electronics to the
left and right LINE LEVEL input of the subwoofer. This may require use of RCA “Y” cables (not supplied) to hookup both the subwoofer and
your electronics. When using this option, it is necessary to adjust the settings on your electronics as follows: Front speakers = “LARGE,”
Subwoofer = “OFF” or “NO.”
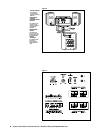
SUBWOOFER ADJUSTMENTS (FIGURE 9)
The PSW202 Powered Subwoofer offers a range of setting options. We recommend the following settings as starting points, but the settings that
are best for you depend upon your speaker placement, electronics and personal taste. After you’ve become familiar with what the settings do,
experiment with alternate options to find the method that works best for your system setup. You’ll find an informative article on “Subwoofer
Positioning and Adjustment” in the set up section at:
HTTP://WWW.POLKAUDIO.COM/HOME/FAQAD/
AC POWER (FIGURE 9)
The PSW202 Powered Subwoofer has a built-in power amplifier and must be plugged into a standard household AC power source in order to
operate. The power switch has three positions: “On,” “Off” and “Auto.” When the Powered Subwoofer is plugged in (even with the power switch
in the “off” position) the power light will glow RED. In the “Auto” position, the amplifier will automatically turn on as soon as the speaker sens-
es a signal coming from your electronics. The power light will change from RED to GREEN upon sensing a signal. The subwoofer will turn off
approximately 15 minutes after input signal ceases, and the power light will return to RED.
In the “On” position, the power amplifier will operate and the power light will glow GREEN until the switch is set to the “Off” position or the
AC cord is disconnected from a power source. We recommend using the “Auto” position. Turn it to “Off” if the system will not be used for
extended periods of time, such as during vacations.
SUBWOOFER LEVEL CONTROL— VOLUME (FIGURE 9)
Subwoofer level (volume) is adjusted via the knob on the rear amplifier plate. To set Subwoofer Level, play a piece of music that has an average
amount of bass content. Start with the knob set to 12 o’clock and the Phase Switch set to 0. Adjust by ear using a wide variety of CDs and video
sources. Adjust for deep, powerful bass without “boominess.”