


The System Setup menu 06
45
En
English
Français
Italiano
Español
Nederlands
Deutsch
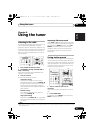
2 Select a setup option.
• Manual – Move the test tone manually
from speaker to speaker and adjust
individual channel levels.
• Auto – Adjust channel levels as the test
tone moves from speaker to speaker
automatically.
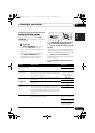
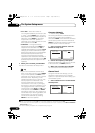
3 Confirm your selected setup option.
The test tones will start after you press ENTER.
After the volume increases to the reference
level, test tones will be output.
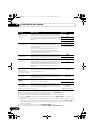
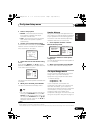
4 Adjust the level of each channel using
/.
If you selected Manual, use / to switch
speakers. The Auto setup will output test tones
in the order shown on-screen:
Adjust the level of each speaker as the test tone
is emitted.
1
5 When you’re finished, press RETURN.
You return to the Manual SP Setup menu.
Tip
• You can change the channel levels at any
time by press RECEIVER, then press CH
SELECT and +/– on the remote control. You
can also press CH SELECT and use / to
select the channel, and then use / to
adjust the channel levels.
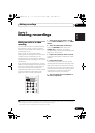
Speaker Distance
For good sound depth and separation from
your system, you need to specify the distance
of your speakers from the listening position.
The receiver can then add the proper delay
needed for effective surround sound.
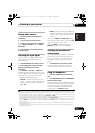
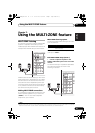
1 Select ‘Speaker Distance’ from the
Manual SP Setup menu.
2 Adjust the distance of each speaker
using /.
You can adjust the distance of each speaker in
0.1 m increments.
3 When you’re finished, press RETURN.
You return to the Manual SP Setup menu.
The Input Assign menu
You only need to make settings in the Input
Assign menu if you have connected
equipment using component video cables.
•Default settings:
Component 1 – BD
Component 2 – TV
If your component is connected via a
component video cable to an input terminal
other than the default, you must tell the
receiver which input terminal your component
is connected to, or else you may see the
composite video input instead of the
component video signal. For more on this, see
Using the component video jacks on page 19.
Note
1• If you are using a Sound Pressure Level (SPL) meter, take the readings from your main listening position and adjust the level
of each speaker to 75 dB SPL (C-weighting/slow reading).
• The subwoofer test tone is output at low volumes. You may need to adjust the level after testing with an actual soundtrack.
2c.Channel Level
Test Tone [ Manual ]
Please Wait . . .20
Caution
Loud test tones
will be output.
Return
2c.Channel Level
Front L
Center
Front R
Surround R
Surr. Back R
Surr. Back L
Surround L
Subwoofer
Return
[ 0dB]
[ 0dB]
[ 0dB]
[ ––– ]
[ ––– ]
[ 0dB]
[ 0dB]
0dB
2.Manual SP Setup
Return
a.Speaker Setting
b.Crossover Network
c.Channel Level
d.Speaker Distance
2d.Speaker Distance
Front L
Center
Front R
Surround R
Surr. Back R
Surr. Back L
Surround L
Subwoofer
Return
3.0 m
[ 3.0 m ]
[ 3.0 m ]
[ 3.0 m ]
[ –––– ]
[ –––– ]
[ 3.0 m ]
[ 3.0 m ]
VSX-819H_RLF.book 45 ページ 2009年1月20日 火曜日 午前10時36分