


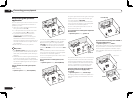
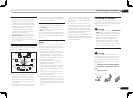

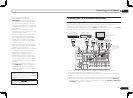
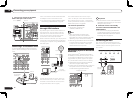
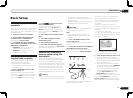

Connecting additional amplifiers
This receiver has more than enough power for any home use, but it’s possible to add additional
amplifiers to every channel of your system using the pre-outs. Make the connections shown below
to add amplifiers to power your speakers.
L
R
IN
CD
IN
SIRIUS
OUT
PRE OUT
SUBWOOFER
1 2
FRONT
CENTER
SURROUND SURR BACK
FH / FW
R
(
CD
)(
DVD
)
COAXIAL
ASSIGNABLE
IN
1
IN
2
(
DVR/BDR
)(
TV/SAT
)
OPTICAL
ASSIGNABLE
IN
1
IN
2
IN
3
OUT
(
VIDEO
)
(
OUTPUT 5
V
0.1 A MAX
)
ADAPTER PORT
DC OUTPUT
for WIRELESS LAN
(
10/100
)
LAN
(
OUTPUT
5 V
0.6 A MAX
)
CENTER
SURROUND
SURROUND BACK
R L
R L
R
L
(
Single
)
(
Single
)
FRONT HEIGHT / FRONT WIDE /
B
AC IN
VIDEO
U
DIO
N
ITOR
UT
R
L
ANALOG
INPUT
R
L
ANALOG
INPUT
R
L
ANALOG
INPUT
ANALOG
INPUT
ANALOG
INPUT
R
L
ANALOG
INPUT
Front channel
amplifier
Center channel
amplifier (mono)
Surround
channel amplifier
Front height or Front wide
channel amplifier
Surround back
channel amplifier
Powered
subwoofer 1
ANALOG
INPUT
Powered
subwoofer 2
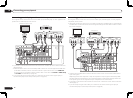
! If you’re not using a subwoofer, change the front speaker setting (see Speaker Setting on page 64 ) to
LARGE.
! You can use the additional amplifier on the surround back channel pre-outs for a single speaker as
well. In this case plug the amplifier into the left (SURROUND BACK L (Single)) terminal only.
! The sound from the surround back terminals will depend on how you have configured the Speaker
system setting on page 66 .
! If you have two subwoofers, the second subwoofer can be connected to the SUBWOOFER 2
terminal. Connecting two subwoofers increases the bass sound to achieve more powerful sound
reproduction. In this case, the same sound is output from the two subwoofers.
! To hear sound only from the pre-outs, switch the speaker system to OFF, or simply disconnect any
speakers that are connected directly to the receiver.
En
20
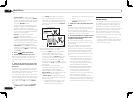
03 Connecting your equipment
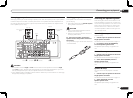
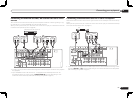
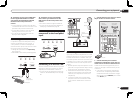
Connecting other audio components
This receiver has both digital and analog inputs, allowing you to connect audio components for
playback.
When you set up the receiver you’ll need to tell the receiver which input you connected the compo-
nent to (see also The Input Setup menu on page 27 ).
RS-232C
ZONE 2
L
R
IN IN IN IN
DVR/BDR
OUTOUT
TV/SAT VIDEO
IN
CD
DVD
IN
SIRIUS
OUT
PRE OUT
SUBWOOFER
1 2
COMPONENT VIDEO
Y P
B
P
R
ASSIGNABLE
MONITOR
OUT
(
DVD
)
IN
1
(
DVR/
BDR
)
IN
2
FRONT
CENTER
SURROUND SURR BACK
FH / FW
(
CD
)(
DVD
)
COAXIAL
ASSIGNABLE
IN
1
IN
2
(
DVR/BDR
)(
TV/SAT
)
OPTICAL
ASSIGNABLE
IN
1
IN
2
IN
3
OUT
(
VIDEO
)
(
OUTPUT 5
V
0.1 A MAX
)
ADAPTER PORT
EXTENSION
DC OUTPUT
for WIRELESS LAN
(
10/100
)
LAN
(
OUTPUT
5 V
0.6 A MAX
)
FRONT CENTER
SURROUND
SURROUND BACK
R L R L
R L
R
L
(
Single
)
(
Single
)
SPEAKERS
FRONT HEIGHT / FRONT WIDE /
B
A
AC IN
FM UNBAL 75
AM LOOP
ANTENNA
(
OUTPUT 5 V
150 mA MAX
)
CONTROL IR
OUT
IN
OUT
IN
VIDEO
AUDIO
MONITOR
OUT
HDMI
BD IN(VIDEO)
IN
1
IN
2
IN
4
IN
5
IN
6
(DVD)
(DVR/BDR)
ASSIGNABLE
1 6
DIGITAL OUT
COAXIAL OPTICAL
DIGITAL IN
OPTICAL
ANALOG
R L
AUDIO OUT
MD, DAT, etc.
Select one
! If your turntable has line-level outputs (i.e., it has a built-in phono pre-amp), connect it to the CD
inputs instead.
! You can’t hear HDMI audio through this receiver’s digital out jack.