


Singing karaoke 06
27
En
English
FrançaisDeutsch
Nederlands
Italiano Español
Chapter 6
Singing karaoke
Singing karaoke
Using the karaoke features you can plug in a
microphone and mix the sound of your own
voice with a backing track.
1
You can select a
backing track from audio sources such as CDs,
DVDs, VCDs or USB devices. Adjust the
microphone level relative to the backing track.
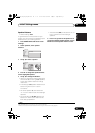
1 Set the MIC VOL knob (front panel) to
minimum.
2 Plug in the microphone(s).
If you’re only using one mic, plug it into the
MIC (MAIN) jack. The MIC (SUB) jack can be
used only if MIC (MAIN) is also connected.
• If the microphone has an on/off switch,
make sure it’s on.
3 Load a karaoke backing disc.
You can also use tracks on a USB device as
source material for a backing track.
4 Adjust KARAOKE Mode settings.
• Press
SHIFT+KARAOKE
to turn KARAOKE
mode on or off for discs that have vocals on
both Left and Right channels:
KARAOKE (Vocal Fade) – Vocals in the
backing track are partially eliminated.
OFF (default) – Switches the Karaoke mode off.
•Press
SHIFT+AUDIO
to switch between
audio channels (except Data discs and USB
sources) with discs that have vocal tracks on
only one channel:
Left – Left channel only. Use for tracks that
have a vocal recorded in the right channel.
Right – Right channel only. Use for tracks that
have a vocal recorded in the left channel.
STEREO – Switches the Karaoke mode off.
5 Play the backing track.
6 Adjust the MIC VOL knob to get the sound
you want.
To avoid unpleasant feedback, make sure you
don’t point the microphone(s) at the speakers.
2
Changing the vocal mix
Adding some effects to the microphone mix
can sometimes improve the overall sound.
3
You can choose between three echo levels.
• To add effects to the microphone mix,
press
SHIFT+
ECHO.
Pressing repeatedly switches between echo
levels 1 to 3 and off.
Changing the backing track
You may want to lower or raise the pitch of the
backing track to match your vocal range.
4
•Press SHIFT+ or SHIFT+ to lower or
raise the pitch of the backing track.
Note
1 • These features are only possible when a microphone is connected. If you try to use SHIFT+KARAOKE, SHIFT+ECHO,
SHIFT+, or SHIFT+ when no mic is connected, a NO MIC error message is displayed. Also note that during DVD playback,
when you connect a mic sound settings are automatically switched to STEREO playback and the player downmixes multichannel
sources to 2.1 channels.
• These features are only available with the DVD/CD or USB input functions.
2 Depending on the microphone level, the sound of the disc may distort. If this happens, turn down the volume.
3 You cannot adjust SFC modes, tone controls (bass, treble, and bass boost), Extra Power mode, Front Surround mode,
MP3 Expander mode or Voice Enhancer mode when a microphone is plugged in.
4 This feature is not compatible with DTS signals.
HTZ170_171_270_272_En.book 27 ページ 2008年2月28日 木曜日 午後1時24分