


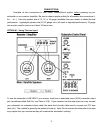


HOME THEATER SETUP: (5 Quantum Plasma Speakers)
All Quantum Plasma Speakers can be used in front, center or rear speaker positions.
• Connect your left & right speakers to your receiver's left & right main (front
speaker) outputs.
• Connect your center channel speakers to your receiver’s center channel speaker
output.
• Connect your left & right surround channel speakers to your receiver’s left & right
surround (rear) channels’ speaker outputs.
VERY IMPORTANT!
Be sure your receiver’s center, main & surround channel modes are all set to SMALL
(NORMAL). This will allow for the greatest bass impact from your system.
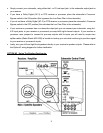
RECOMMENDED MAIN AND CENTER SPEAKER PLACEMENT:
• The best distance between the main speakers is dependent upon room
conditions, size, and the proximity of the listening area to the speakers; usually 6-
12 feet is appropriate. A bit of experimentation is in order, but smaller rooms will
better tolerate closer spacing between the speakers.
• We recommend you place your center speaker horizontally on top of (or just
below) your TV.
RECOMMENDED SURROUND SPEAKER PLACEMENT:
• Behind you, equally spaced to your left and right.
One general rule of thumb: try to position speakers so that the tweeter's level is fairly
close to your ear level in your normal listening position. High frequencies are much
more directional than lows so it is best that your ears are within a fairly direct path to
the tweeter's output.
GRILLES:
Your Quantum Plasma speaker comes with two grilles. One silver, one black. If you
would like to change grilles please read the following instructions.
• Using an awl or similar tool, carefully pry the grill off of one side of the speaker by
catching it by one of its holes near the edge. Slowly pull the grill completely out of
it’s groove on that side of the cabinet. Remove grill from speaker.
• Slide the left side of the other grill into the groove on the left side of the cabinet.
Bend the grill slightly until it’s right side pops into the right hand groove.
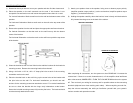
ON-WALL MOUNTING INSTRUCTIONS:
INSTALLATION NOTES:
The hanging methodology employed with this product is intended for mounting on
walls of standard construction, which includes most residential environments. Such
environments are typically constructed with wooden studs behind the walls that will
securely accept the enclosed screws. If you do not notice resistance behind the wall
when drilling the pilot hole you probably do not have a stud in that location and will
then need to use the enclosed wall anchors. In installations with concrete, brick,
cinder block or stone walls we recommend the use of 1.5” to 2" concrete nails.
TOOLS REQUIRED:
• #2 Philips head screwdriver bit or hand screwdriver.
• Stud Finder
• Drill - electric or cordless, with 1/8” bit. Note: If you do not have access to a drill
and you know there is a stud in the wall at your desired mounting location you
may use nails to attach the speaker’s mounting bracket to the wall. We
recommend 'common nail 10D'.