12 Hookups - TV (cont’d)
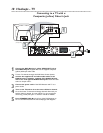
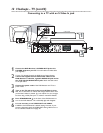
Connecting to a TV with an S-Video In jack
Back of TV
(example only)
Rear of DVD Receiver
1
S-Video Cable
Red & White
Audio Cable
AUDIO IN
AUDIO OU
DIGITAL OUT
R
FR SR
CENTER
LINE OUT
WOOPER
LINE OUT
AUX
COMPONENT
VIDEO OUT
P-SCAN
OFF ON
OPTICAL
COAXIAL
S-VIDEO
OUT
VIDEO
OUT
PrCr
PbCb Y
CLASS 1
LASER PRODUCT
AM/FM
ANTENNA
+ +
-
-
SPEAKERSPEAKER
4
AM
3
2
1
Connect the DVD Receiver’s S-VIDEO OUT jack to the
S-VIDEO IN jack on your TV. You will need an S-Video cable
(not supplied).
2
To hear TV channels through the DVD Home Cinema System,
connect the supplied red and white audio cables to the
DVD Receiver’s red/white, right/left AUDIO IN jacks and to
the TV’S right/left AUDIO OUT jacks. Match the cable colors
to the jack colors.
3
Connect the power cords of the DVD Receiver and TV to a
power outlet.
4
Turn on the TV and set it to the correct S-Video In chan-
nel. Go to the lowest TV channel and change channels down until
you find the S-Video In channel. (It is not channel 3 or 4 as it might
be when using a VCR.)
See your TV owner’s manual for details.
5
Press STANDBY-ON
yy
on the front of the DVD Receiver to
turn on the DVD Receiver. The red Standby light will disappear.
6
It is not necessary to set VIDEO OUT to S-VIDEO.
S-VIDEO is the DVD Receiver’s default setting. However, if your
picture is distorted, check the VIDEO OUT setting. Make sure it is
set to S-VIDEO. Details are on page 28.


