


GENERAL INFORMATION ON RECORDING
¥ Recording is permissible insofar as copyright or.
other rights of third parties are not infringed.
¥ For recording, use only NORMAL type cassettes
(IEC type I) on which the tabs have not yet been
broken. This deck is not suited for recording on
CHROME (IEC II) or METAL (IEC IV) type cassettes.
¥ The best recording level is set automatically.
Altering the VOLUME or DBB controls will not
affect the recording.
¥ To protect a tape from accidental erasure, break
out the tabs. If you wish to record again, cover the
tabs with a piece of adhesive tape.
CD Synchro Start recording
1 Select CD function.
2 Insert a CD and if desired, programme track num-
bers.
3 Open the cassette door.
4 Insert a suitable tape into the cassette deck and
close the door.
5 Press RECORD 0 to start recording.
— Playing of the CD/program starts automatically
from the beginning. You don t need to start the
CD player separately.
™ To select and record a particular passage within
a CD track:
¥ Press ∞ or §. Release the control when you
recognize the passage you want.
¥ To pause CD playback, press 2;.
¥ Recording starts from this exact point in the
track when you press RECORD 0.
6 To pause recording, press PAUSE ;.
Press PAUSE ; again to resume recording.
7 To stop recording, press STOP/OPEN 9/.
Recording from the Radio
1 Tune to the desired radio station (see Tuning to
radio stations).
2 Follow steps 3-7, under CD Synchro Start record-
ing.
Maintenance & Safety
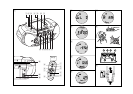
CD player and CD handling (See 8)
¥ If the CD player cannot read CDs correctly, use a
cleaning CD to clean the lens before taking the set
to repair.
¥ The lens of the CD player should never be touched!
¥ Sudden changes in the surrounding temperature
can cause condensation on the lens of your CD
player. Playing a CD is then not possible. Do not
attempt to clean the lens but leave the set in a
warm environment until the moisture evaporates.
¥ Always close the CD door to avoid dust on the
lens.
¥ To clean the CD, wipe in a straight line from the
centre towards the edge using a soft, lint-free
cloth. Do not use cleaning agents as they may
damage the disc.
¥ Never write on a CD or attach any stickers to it.
Safety Information
¥ Don t expose the set, batteries, CDs or cassettes to
humidity, rain, sand or excessive heat.
¥ Clean the set with a dry cloth. Don t use any clean-
ing agents containing alcohol, ammonia, benzene
or abrasives as these may harm the set.
¥ Place the set on a hard and flat surface so that the
system does not tilt. Make sure there is good ven-
tilation to prevent the set overheating.
¥ The mechanical parts of the set contain self-lubri-
cating bearings and must not be oiled or lubricated.
Tape deck maintenance (See 9)
To ensure quality recording and playback of the tape
deck, clean parts A, B and C as shown, once a
month. Use a cotton bud slightly moistened with alco-
hol or a special head cleaning fluid to clean the deck.
1 Open the cassette door.
2 Press PLAY 1 and clean the roller C.
3 Press PAUSE ; and clean the heads A, and the
capstan B.
4 After cleaning, press STOP/OPEN 9/.
Remote control does not function properly
– Batteries exhausted/ incorrectly inserted
¥ Insert (fresh) batteries correctly
– Distance/ angle between the set too large
¥ Reduce the distance/ angle
No sound /power
– Volume not adjusted
¥ Adjust the VOLUME
– Power cord not securely connected
¥ Connect the AC power cord properly
– Batteries dead/ incorrectly inserted
¥ Insert (fresh) batteries correctly
– Headphones connected to the set
¥ Disconnect headphones
Severe radio hum or noise
– Electrical interference: set too close to TV, VCR or
computer
¥ Increase the distance
Poor radio reception
– Weak radio signal
¥ FM: Adjust the FM telescopic aerial
Poor cassette sound quality
– Dust and dirt on the heads, etc.
¥ Clean deck parts, see Maintenance
– Use of incompatible cassette types
(METAL or CHROME)
¥ Only use NORMAL (IEC I) for recording
Recording does not work
– Cassette tab(s) may be broken
¥ Apply adhesive tape over the missing tab space
/ indication
– CD badly scratched or dirty
¥ Replace/ clean CD, see Maintenance
– Laser lens steamed up
¥ Wait until lens has cleared
– CD-R(W) is blank/ not finalized
¥ Use a finalized CD-R(W)
– CD-ROM disc inserted/
CD contains non-audio files
¥ Use CD Audio discs only/
press ∞ or § once or more to skip to a CD audio
track instead of the data files
The CD skips tracks
– CD damaged or dirty
¥ Replace or clean CD
– SHUFFLE or PROGRAM is active
¥ Switch off SHUFFLE / PROGRAM
WARNING
Do not open the set as there is a risk of electric shock! Under no circumstances should you try to
repair the set yourself, as this will invalidate the guarantee.
If a fault occurs, first check the points listed below before taking the set for repair.
If you are unable to remedy a problem by following these hints, consult your dealer or service centre.
CASSETTE RECORDER MAINTENANCE & SAFETY TROUBLESHOOTING
Environmental information
We have done our best to reduce the packaging and make it easy to separate into 3 materials: cardboard,
expandable polystyrene, polyethylene.
Your set consists of materials which can be recycled if disassembled by a specialized company. Please observe
the local regulations regarding the disposal of packaging, dead batteries and old equipment.